
Collection
Methods
- Validate :command checks a collection’s data and indexes for correctness and returns the results.
- Note: Due to the performance impact of validation, consider running
validateonly on secondary replica set nodes. and when running this cmd it will lock the collection
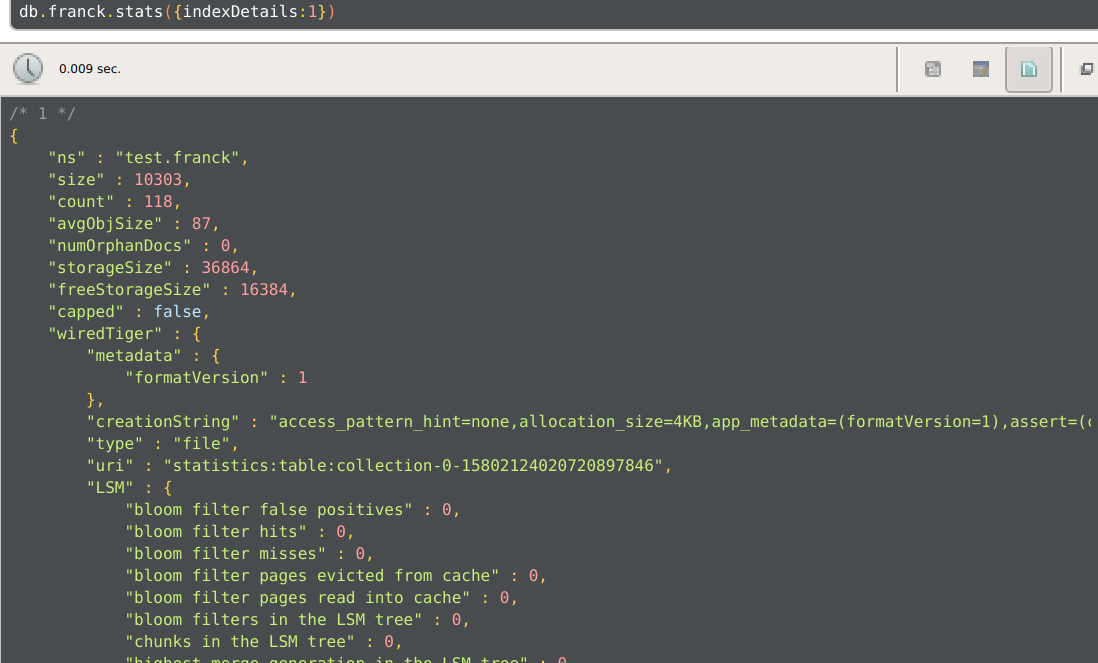
{
    "ns" : "myCollection.questions",
    "nInvalidDocuments" : 0,
    "nrecords" : 1131552,
    "nIndexes" : 4,
    "keysPerIndex" : {
        "_id_" : 1131552, // NO of keys in index
    },
    "indexDetails" : {
        "_id_" : {
            "valid" : true
        }
    },
    "valid" : true,
    "repaired" : false,
    "warnings" : [],
    "errors" : [],
    "extraIndexEntries" : [],
    "missingIndexEntries" : [],
    "corruptRecords" : [],
    "ok" : 1.0
}
Indexing
Index wil be used only if the key is in prefix of the index let say we have a index for {a:1, b:1} where we query using find({b:1}) it won’t use the index becuase it same COLSCAN it need to scan whole index to filter out
db.find({b:100}).sort({a:-1}).explain("execuionStats") → in this query even though it used index the totalDocsExamined is same as the total document present in db so it similary to COLSCAN
{
            "stage" : "FETCH",
            "filter" : {
                "b" : {
                    "$eq" : 100.0
                }
            },
            "inputStage" : {
                "stage" : "IXSCAN",
                "keyPattern" : {
                    "a" : 1.0,
                    "b" : 1.0
                },
                "indexName" : "a_1_b_1",
                "isMultiKey" : false,
                "multiKeyPaths" : {
                    "a" : [],
                    "b" : []
                },
                "isUnique" : false,
                "isSparse" : false,
                "isPartial" : false,
                "indexVersion" : 2,
                "direction" : "backward",
                "indexBounds" : {
                    "a" : [
                        "[MaxKey, MinKey]"
                    ],
                    "b" : [
                        "[MaxKey, MinKey]"
                    ]
                }
            }
        }

"executionStats" : {
        "executionSuccess" : true,
        "nReturned" : 3,
        "executionTimeMillis" : 1580,
        "totalKeysExamined" : 1131552,
        "totalDocsExamined" : 1131552,
        "seeks": 1   ->  with only one seek to the minimum index bound
        "executionStages" : {
           ...
            }
        }
    },
Split compound indexes into multiple single-field indexes if the query pattern changes frequently.
Avoid creating indexes on fields with low cardinality or high update frequency.
Keep the low cardinality key on the last of then index let say we have isDeleted,Name,age where isDeleted will have only 2 value and 90% of the document have false then it better to put on last which make the index them more selective so it need to scan only less no of doc in index.
Index intersection MongoDB scans each selected index to retrieve the relevant data. This is done in parallel, using multiple threads or processes. intersects the results from each index scan, combining the data to produce the final result set. This is done using a bitwise AND operation, where the resulting documents are those that exist in all the intersecting indexes.
{
  "stage": "FETCH",
  "filter": {
    "$and": [
      {
        "a": {
          "$eq": "hello"
        }
      },
      {
        "b": {
          "$eq": 100
        }
      }
    ]
  },
  "inputStage": {
    "stage": "AND_SORTED",
    "inputStages": [
      {
        "stage": "IXSCAN",
        "indexBounds": {
          "a": [
            "[\"hello\", \"hello\"]"
          ]
        }
        ...
      },
      {
        "stage": "IXSCAN",
        "indexBounds": {
          "b": [
            "[100.0, 100.0]"
          ]
        },
        ...
      }
    ]
  }
}
Sparse and partial
 db.restaurants.createIndex(
	{"address.city": 1, cuisine: 1},
	{partialFilterExpression: {"stars": {$gte: 3.5}}}
)
> exp.find({'address.city': 'New York', cuisine: 'Sichuan'})
After that last explain, would think partial index would be used but it’s not, still doing COLLSCAN.
To use partial index, query must be guaranteed to match subset of docs specified by filter expression. Otherwise server might miss results where matching docs not indexed.
To make index used, need to include predicate that matches partial filter expression, stars in our example:
> exp.find({'address.city': 'New York', cuisine: 'Sichuan', stars: {$gt: 4.0}})Now, IXSCAN is used.
Index stats
col.aggregate([{$indexStats: {}}])

{
    "name" : "a_1",
    "key" : {
        "a" : 1.0
    },
    "accesses" : {
        "ops" : NumberLong(1), //no of operation per sec
        "since" : ISODate("2024-07-24T04:20:41.751Z") //since
    },
    "spec" : {
        "v" : 2,
        "key" : {
            "a" : 1.0
        },
        "name" : "a_1"
    }
}
NOTE: maximum number of indexes per collection (64).
ESR
When applying ESR keep the pagination in the mind when we have pagination
With Pagination (skip and limit):
db.transactions
  .find({ user_id: { $gte: userIdStart, $lte: userIdEnd } })
  .sort({ transaction_date: -1 })
  .skip(100)
  .limit(100);
When you have pagination (skip and limit), the index { transaction_date: -1, user_id: -1 } will perform better. Here’s why:
- Sort First (
transaction_date: -1): Since you’re sorting bytransaction_date, placingtransaction_datefirst in the index helps MongoDB to quickly sort and filter the data. - Range Filter (
user_id: { $gte: userIdStart, $lte: userIdEnd }): Theuser_idfilter is a range, so it’s better to place it aftertransaction_datein the index. - Pagination: The
skipandlimitoperations can then be efficiently applied because the results are already sorted bytransaction_date, and MongoDB doesn’t need to re-sort after applying the range filter.
So, the index { transaction_date: -1, user_id: -1 } is optimal for pagination because it avoids the need for extra sorting and lets MongoDB directly access and paginate through the sorted results.
Without Pagination:
If we remove the skip and limit, the query would look like this:
db.transactions
  .find({ user_id: { $gte: userIdStart, $lte: userIdEnd } })
  .sort({ transaction_date: -1 });
In this case, the index { user_id: -1, transaction_date: -1 } would be better. Here’s why:
- Equality Predicate (
user_id): The query filters onuser_idwith a range condition, so it’s best to placeuser_idfirst in the index. - Sort Predicate (
transaction_date): After filtering byuser_id, the results need to be sorted bytransaction_date. Havingtransaction_datesecond in the index makes sorting efficient.
So, the index { user_id: -1, transaction_date: -1 } is ideal because it directly supports the filtering on user_id first, followed by sorting by transaction_date.
- Equality predicates (E) should be placed first in the index.
- Sort predicates (S) should follow equality predicates if both are present.
- Range predicates (R) (like
total_amountin the example) should come last. - For pagination, avoiding unnecessary sort operations is crucial for scalability. The index should allow the database to quickly find the relevant documents and return them in the correct order without extra sorting.
Query Plans
For any given query, the MongoDB query planner chooses and caches the most efficient query plan given the available indexes. To evaluate the efficiency of query plans, the query planner runs all candidate plans during a trial period. In general, the winning plan is the query plan that produces the most results during the trial period while performing the least amount of work.
The associated plan cache entry is used for subsequent queries with the same query shape.
How is query plan selected?
MongoDB has empirical query planner - trial period where each candidate plan is executed over short period of time. Planner evaluates which performs the best:
Query Shape
To help identify slow queries with the same query shape, each query shape is associated with a queryHash. The queryHash is a hexadecimal string that represents a hash of the query shape and is dependent only on the query shape.
To get the information on the plan cache entries for the collection
planCacheKey is a hash of the key for the plan cache entry associated with the query.
db.collection.getPlanCache().clear()

db.collection.getPlanCache().listQueryShapes()

db.orders.aggregate( [
   { $planCacheStats: { } }
] )
- WiredTiger stores documents with the snappy compression algorithm by default. Any data read from the file system cache is first decompressed before storing in the WiredTiger cache
To just get the quer plan but not want to excute the query use below cmd
db.collectionName.explain("queryPlanner")Over time, collection and indexes may change, therefore plan cache will evict the cache occasionally. Plans can be evicted when:
- Server restarted.
- Amount of work performed by first portion of query exceeds amount of work performed by winning plan by factor of 10.
- Index rebuilt.
- Index created or dropped.
Covered index perf tips
Add projection to query such that only index fields are included:
db.restaurants.createIndex({name: 1, cuisine: 1, stars: 1})

db.restaurants.find({name: { $gt: 'L' }, cuisine: 'Sushi', stars: { $gte: 4.0 } }, { _id: 0, name: 1, cuisine: 1, stars: 1 })
Then all data to be returned exists in keys of index. Mongo can match query conditions AND return results only using index.
Creating above index and running query in shell, executionStats show totalDocsExamined: 0.
Caveat, if run the same query but modify projection to omit fields that are not index (as opposed to explicitly asking for fields that are in index):
db.restaurants.find({name: { $gt: 'L' }, cuisine: 'Sushi', stars: { $gte: 4.0 } }, { _id: 0, address: 0 })executionStats shows totalDocsExamined: 2870, even though query is the same as before. Query planner does not know what other fields might be present, might have some docs with fields that are not covered by index, therefore it needs to examine the documents.
Regex Performance
Performance can be improved by creating index: db.users.createIndex({username: 1}). Now only need to check regex against username index key instead of entire document.
However, still need to look at every single key of index, defeats purpose of index. Recall index stored as B-tree to reduce search space to ordered subset of entire collection.
To take advantage of index when using regex, add ^ at beginning of regex to indicate - only want to return docs where the following chars start at beginning of string.
db.users.find({username: /^kirby/})### index prefix Index files use prefix compression - use 0 ⇒ use - used 1 ⇒ 0d - useful 2 ⇒ 0ful - usefully 3 ⇒ 2ly - usefulness 4 ⇒ 2ness - useless 5 ⇒ 0less - uselessness 6 ⇒ 5ness
Questions to ask before creating indexing
- Cardinatlity
- Is the how distnict vaule the key will have
- When creating index put low cardinality key first because index will take less space due to index prefix comprassion
- how frequent the field get updated?
- Another exception is when have indexes on fields that grow monotonically - eg: counters, dates, incremental id’s. Recall index is b-tree. Monotonically incrementing fields will cause index to become unbalanced on the right hand side → grows with new data incoming.
Note: Cardinatlity mostly wont be problem we need to check
1. Low Cardinality Fields (Processing, Done) in MongoDB
This is about how filtering on low-cardinality fields affects query performance.
Suppose we have a orders collection:
{
  "_id": ObjectId("..."),
  "customer": "John Doe",
  "status": "processing",  // Possible values: "processing", "shipped", "delivered"
  "total": 100
}
Let’s say we query all processing orders:
db.orders.find({ status: "processing" })Indexing Considerations:
If very few orders are “processing”
-
Creating an index on
statushelps:db.orders.createIndex({ status: 1 }) -
MongoDB quickly filters the small subset of “processing” orders.
If many orders are “processing”
- If 40% of all orders are “processing,” the index doesn’t help much because MongoDB still has to scan a large number of documents.
📌 Key MongoDB Takeaway:
- Indexing a low-cardinality field only helps if it significantly reduces the number of documents left to scan.
- If too many documents match, the index won’t be effective.
2. Compound Index (Country, State, Zip Code) in MongoDB
This is about how the order of fields in a compound index affects performance.
{
  "_id": ObjectId("..."),
  "name": "Tech Store",
  "country": "USA",
  "state": "CA",
  "zip_code": "90210"
}
Index Order Matters Option 1: (country, state, zip_code)
db.stores.createIndex({ country: 1, state: 1, zip_code: 1 })-
Efficient for queries like:
db.stores.find({ country: "USA", state: "CA" })
Option 2: (zip_code, state, country)
db.stores.createIndex({ zip_code: 1, state: 1, country: 1 })- Not efficient for the same query because MongoDB must scan many
zip_codevalues first.
Key MongoDB Takeaway:
-
Indexing order matters! Queries should match the prefix of the compound index for efficiency.
-
The total number of matched documents stays the same, but the speed of finding them depends on index structure.
Debugging tools
- mongotop
- mongostat : it built with go and under the hood it using
serverStatuscmd to gather info
Aggregation
Start with step that filter out most of the data.
- Two consecutive matches should be combined with $and clause
- Consider project as last step in pipeline. Pipeline can work with minimal data needed for result.
- If we do project early in the pipeline chances are that pipeline may not have some variable that it needs.
- If we need to have a calculated result $set (equivalent of $addField) stage is recommended.
- $unwinding an array only to $group them using same field is anti-pattern.
- Better to use accumulators on array.
- Prefer streaming stages in most of the pipelines, use blocking stages at the end.
- $sort(withoutIndex),$group,$bucket,$facet are blocking stages.
- Streaming stage will process documents as they come and send to the other side.
- Blocking stages wait for all document to enter in the stage to start processing.
System Info
db.hostInfo() : tell about mongodb host info like cpu, memory,os etc.
Eviction
In MongoDB, eviction refers to the process of removing data from the in-memory cache
Eviction Process:
- Eviction Walk: MongoDB performs an eviction walk, which is a process that scans the cache and identifies candidate pages for eviction.
- Page Selection: MongoDB selects pages to evict based on factors such as:
- Least Recently Used (LRU) pages
- Pages with low access frequency
- Pages that are not pinned in memory (e.g., not currently being accessed)
- Page Eviction: The selected pages are evicted from the cache, and the corresponding data is written to disk.
Eviction Metrics:
- eviction walks: The number of eviction walks performed.
- eviction walks gave up because they restarted their walk twice: The number of eviction walks that restarted twice, indicating high eviction pressure.
- pages evicted: The number of pages evicted from the cache.
- pages evicted by application threads: The number of pages evicted by application threads, indicating eviction due to memory pressure.
Cache eviction thresholds
- Read Cache
- Below 80% utilisation: no cache eviction
- 80%+ utilisation: evictions are done on background threads
- 95%+ utilisation: evictions are done on application threads
- 100% utilisation: no new operations until some evictions occur
- Dirty Cache: (As of 3.2.0 )
- Below 5%: No special policy
- 5%+: Writes are done using background threads
- 20%+: Start using application threads to help.
NOTE: If some write happens to the document in the key, that page image is considered as dirty.All the consecutive changes are stacked on top of each other in a data structure called skip list.
RAM and cache usage
The Wired Tiger cache will be set to either 50% of total memory minus 1GB or to 256MB use db.serverStatus() to get more details
wiredTiger.cache["maximum bytes configured"] // will tell how much allocated for wired tiger

db.serverStatus().globalLock
{
"currentQueue" : {
        "total" : 0,
        "readers" : 0,
        "writers" : 0
    },
    "activeClients" : {
        "total" : 0,
        "readers" : 0,//Number of clients with read operations in progress or queued
        "writers" : 0
    }
}

opcounters

{
    "insert" : NumberLong(0), //No of insert will be stored until system restart
    "query" : NumberLong(46),
    "update" : NumberLong(55),
    "delete" : NumberLong(2),
    "getmore" : NumberLong(60),
    "command" : NumberLong(669)
}

opLatencies
 {
		 //Total latency statistics for read requests per second
        "reads" : {
            "latency" : NumberLong(30163526),
            "ops" : NumberLong(91)
        },
        "writes" : {
            "latency" : NumberLong(0),
            "ops" : NumberLong(0)
        },
        "commands" : {
            "latency" : NumberLong(250994),
            "ops" : NumberLong(697)
        }
}
REFER : https://www.datadoghq.com/blog/monitoring-mongodb-performance-metrics-wiredtiger/#storage-metrics
function bytesToGB(bytes) {
    return (bytes / (1024 * 1024 * 1024)).toFixed(2);
}

function checkWiredTigerCacheStats() {

    var status = db.serverStatus();

    var cacheStats = status.wiredTiger.cache;

    // Extract relevant fields
    var maxBytesConfigured = cacheStats["maximum bytes configured"];
    var bytesInCache = cacheStats["bytes currently in the cache"];
    var dirtyBytesInCache = cacheStats["tracked dirty bytes in the cache"];
    var pagesReadIntoCache = cacheStats["pages read into cache"];
    var pagesWrittenFromCache = cacheStats["pages written from cache"];

    // Check if bytes in cache exceed maximum bytes configured
    var isCacheFull = bytesInCache >= maxBytesConfigured;

    // Calculate the threshold for dirty bytes (5% of max cache size)
    var dirtyBytesThreshold = maxBytesConfigured * 0.05;
    var isDirtyBytesHigh = dirtyBytesInCache > dirtyBytesThreshold;

    // Calculate per-second rates for page reads and writes
    var uptimeSeconds = status.uptime;
    var pagesReadPerSecond = pagesReadIntoCache / uptimeSeconds;
    var pagesWrittenPerSecond = pagesWrittenFromCache / uptimeSeconds;

    // Print the results
    print("WiredTiger Cache Stats:");
    print("Maximum Bytes Configured: " + bytesToGB(maxBytesConfigured) + " GB");
    print("Bytes Currently in Cache: " + bytesToGB(bytesInCache) + " GB");
    print("Dirty Bytes in Cache: " + bytesToGB(dirtyBytesInCache) + " GB");
    print("Dirty Bytes Threshold (5% of Max): " + bytesToGB(dirtyBytesThreshold) + " GB");
    print("Pages Read into Cache (Total): " + pagesReadIntoCache);
    print("Pages Written from Cache (Total): " + pagesWrittenFromCache);
    print("Pages Read per Second: " + pagesReadPerSecond.toFixed(2));
    print("Pages Written per Second: " + pagesWrittenPerSecond.toFixed(2));

    // Evaluate the cache status
    if (isCacheFull) {
        print("Warning: Cache is full or nearly full. Consider scaling out.");
    } else {
        print("Cache usage is within the configured limit.");
    }

    if (isDirtyBytesHigh) {
        print("Warning: Dirty bytes in cache exceed 5% of maximum cache size. Consider scaling out.");
    } else {
        print("Dirty bytes in cache are within acceptable limits.");
    }
}

// Run the function
checkWiredTigerCacheStats();
db.collectioname.aggregate( [ { $collStats: { storageStats:{} } } ] ) → To get collection level memory allocated detail
Note: There will be rool level wired triger cache which will be cache allocated for collection data if we want index level cache check on each index level cache detail in indeDetails
{
"storageStats" : {
..
size:"", //**`size`**: The `size` field represents the total uncompressed size of all documents in the collection,
storagesize:"" //comperesed size including index size
"wiredTiger" : {
"cache" : {
// how much of index is in RAM
"bytes currently in the cache" : 3568,
//"cache miss," where the requested data is not found in the cache and must be fetched from disk so how much bytes read in to cache
"bytes read into cache" : 1160,
//the amount of bytes write from cache to disk this happen when the cache get udpate
"bytes written from cache":0
// use to determine hit and pass page ratios
"pages read into cache" : 3,
//the number of pages that were requested from the cache (i.e., from RAM) to satisfy queries
"pages requested from the cache" : 2,
}
},
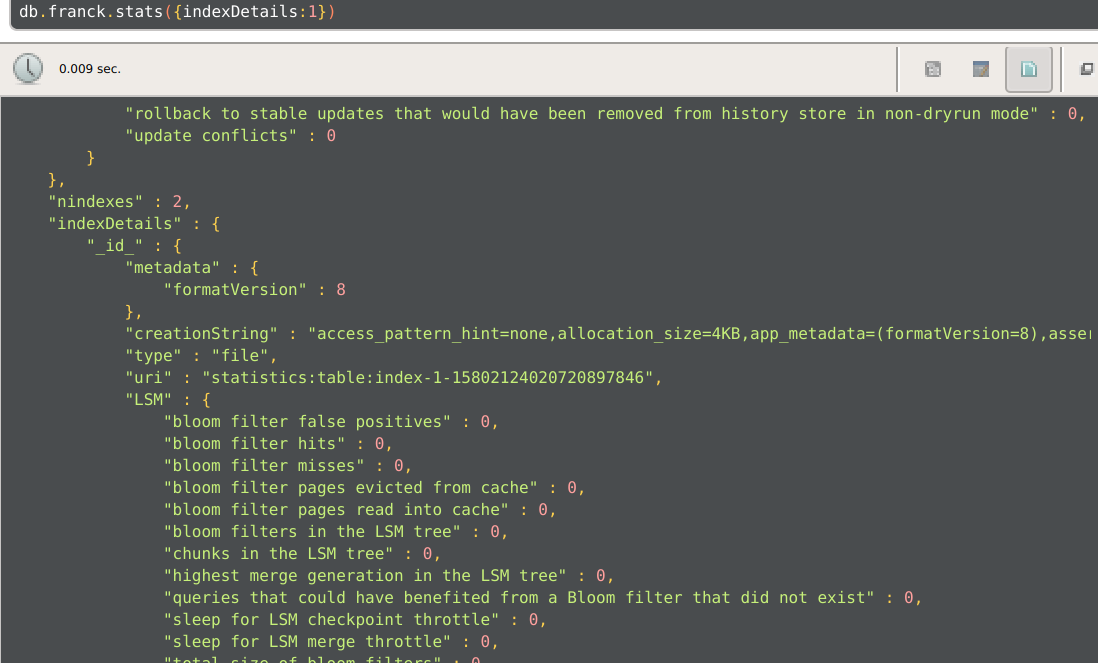
"indexDetails": {
"indexName":{
"cache" : {
"bytes currently in the cache" : 357142535,
}
}
}Deleted documents
How Deletion Works Internally
-
When a TTL index removes a document, MongoDB does not immediately reclaim the storage space.
-
Instead, it marks the document as deleted in its internal storage engine (WiredTiger).
-
Queries might still scan over these now-empty storage slots, which could impact performance if large numbers of documents are deleted frequently.
-
Since MongoDB uses B-tree-like indexes, if a page contains multiple documents and some are deleted, the remaining queries might still need to traverse that page before skipping it.
-
This can introduce inefficiencies if:
- A large number of documents are being deleted regularly.
- Queries are scanning large sections of the index that contain empty pages.
Example Let’s say a page looks like this:
+------------------+
| Page 101         |
+------------------+
| Doc A (Live)     |
| Doc B (Deleted)  | <- TTL expired
| Doc C (Deleted)  | <- TTL expired
| Doc D (Live)     |
+------------------+
Now your query comes in:
db.sessions.find({ userId: "abc123" })The index tells MongoDB:
“Hey, userId = abc123 might be in Page 101.”
MongoDB loads Page 101, sees:
- Doc A → Not a match
- Doc B → Deleted → Skip
- Doc C → Deleted → Skip
- Doc D → Not a match
So even though your query matches no results, MongoDB still scanned the page and did the I/O. This affects latency and cache pressure.
We not able to know even when try to get the executionstats for the query
To get the free storage size in the db that not used by database
db.runCommand(
   {
     dbStats: 1,
     freeStorage: 1
   }
)
- Free database storage space is allocated to the collection but does not contain data. (does not include free space allocated to indexes)
- If the instance has a large number of collections or indexes, obtaining free space usage data may cause processing delays.
Tcmalloc
MongoDB uses tcmalloc memory allocator to allocate and release memory back to system.
tcmalloc store all free deleted doc space in free linked list and that will be in RAM to see how much it taking 3526.2 MiB
db.serverStatus().tcmalloc


 "generic" : {
        "current_allocated_bytes" : 1525905016,
        "heap_size" : NumberLong(5481074688)
    },
    "tcmalloc" : {
        "pageheap_free_bytes" : NumberLong(3697467392),
        "pageheap_unmapped_bytes" : 61435904,
        "max_total_thread_cache_bytes" : 1033895936,
        "current_total_thread_cache_bytes" : 48960368,
        "total_free_bytes" : 196266376,
        "central_cache_free_bytes" : 145543512,
        "transfer_cache_free_bytes" : 1762496,
        "thread_cache_free_bytes" : 48960368,
        "aggressive_memory_decommit" : 0,
        "pageheap_committed_bytes" : NumberLong(5419638784),
        "pageheap_scavenge_count" : 5456,
        "pageheap_commit_count" : 26172,
        "pageheap_total_commit_bytes" : NumberLong(7555059712),
        "pageheap_decommit_count" : 5456,
        "pageheap_total_decommit_bytes" : 2135420928,
        "pageheap_reserve_count" : 4045,
        "pageheap_total_reserve_bytes" : NumberLong(5481074688),
        "spinlock_total_delay_ns" : NumberLong(4011643157),
        "release_rate" : 1.0,
        "formattedString" : ""
    }
}


Formated string
------------------------------------------------
MALLOC:     1525905464 ( 1455.2 MiB) Bytes in use by application
MALLOC: +   3697467392 ( 3526.2 MiB) Bytes in page heap freelist
MALLOC: +    145543512 (  138.8 MiB) Bytes in central cache freelist
MALLOC: +      1762496 (    1.7 MiB) Bytes in transfer cache freelist
MALLOC: +     48959920 (   46.7 MiB) Bytes in thread cache freelists
MALLOC: +     34734080 (   33.1 MiB) Bytes in malloc metadata
MALLOC:   ------------
MALLOC: =   5454372864 ( 5201.7 MiB) Actual memory used (physical + swap)
MALLOC: +     61435904 (   58.6 MiB) Bytes released to OS (aka unmapped)
MALLOC:   ------------
MALLOC: =   5515808768 ( 5260.3 MiB) Virtual address space used
MALLOC:
MALLOC:          81831              Spans in use
MALLOC:            550              Thread heaps in use
MALLOC:           4096              Tcmalloc page size
------------------------------------------------
Call ReleaseFreeMemory() to release freelist memory to the OS (via madvise()).
Bytes released to the OS take up virtual address space but no physical memory.
-
Keeps freed memory in internal free lists (per-thread or global).
-
Tracks blocks by size class (e.g., 16B, 32B, 64B…).
-
When you allocate memory, it:
- Checks if there’s a block of the right size in its cache.
- If yes → reuse ✅
- If not → get more memory from OS.
This model is:
- Fast (no system calls)
- Efficient for reuse
- But can build up fragmentation and memory bloat
Currently page reuse handled by mongodb if we want to handle that by OS we can set
db.adminCommand( { setParameter: 1, tcmallocAggressiveMemoryDecommit: 1 } )
MongoDB uses tcmalloc memory allocator to allocate and release memory back to system. Free memory can be released immediately after it is marked as free by setting the parameter tcmallocAggressiveMemoryDecommit to 1 Pages marked as unused are decommitted (not mapped in physical RAM anymore).
- Freed memory is decommitted:
- OS marks those pages as no longer part of the process’s working set.
- The memory is gone from
tcmalloc’s usable pool.
- tcmalloc can’t reuse that memory directly:
- It has to request new memory from the OS (
mmap,brk, etc). - That’s slower than just reusing cached memory.
- It has to request new memory from the OS (
- Tracking still happens at a coarse level:
- tcmalloc maintains metadata about allocations.
- It knows the memory is decommitted but not reusable unless it gets it again from OS.
So os will allocate will do reusing the delted pages but
- Slightly slower performance (more system calls to release memory)
- May reduce tcmalloc’s reuse efficiency
when it will be usefull
- Systems with high TTL deletes, frequent batch operations, or aggregation queries that consume bursts of RAM.
autoCompact
New in version 8.0.
Enables or disables background compaction. When enabled, autoCompact periodically iterates through all available files and continuously runs compaction if there is enough free storage space available.
Files Organization
Files in mongodb path mongod --dbpath /data/db
WiredTiger                           diagnostic.data
WiredTiger.lock                      index-1-5808622382818253038.wt
WiredTiger.turtle                    index-3-5808622382818253038.wt
WiredTiger.wt                        index-5-5808622382818253038.wt
WiredTigerLAS.wt                     index-6-5808622382818253038.wt
_mdb_catalog.wt                      index-8-5808622382818253038.wt
collection-0-5808622382818253038.wt  journal
collection-2-5808622382818253038.wt  mongod.lock
collection-4-5808622382818253038.wt  sizeStorer.wt
collection-7-5808622382818253038.wt  storage.bson
For each collection and index, WiredTiger storage engine writes an individual .wt file. _mdb_catalog` Catalog file contains catalog of all collections and indexes that mongod contains.
Journal
Essential component of persistence. Journal file acts as safeguard against data corruption caused by incopmlete file writes. eg: if system sufferes unexpected shutdown, data stored in journal is used to recover to a consistent and correct state.
ls /data/db/journal
WiredTigerLog.0000000001      WiredTigerPreplog.0000000002
WiredTigerPreplog.0000000001
Journal file structure includes individual write operations. To minimize performance impact of journalling, flushes performed with group commits in compressed format. Writes to journal are atomic to ensure consistency of journal files.
Cache Overflow and the LookAside Table
When WiredTiger’s cache becomes full (cache pressure gets too high), it needs to free up space by evicting pages from the cache. However, if there are updates to those pages that haven’t yet been written to disk, WiredTiger uses the LookAside (LAS) table to store these updates temporarily. This process ensures that the cache can continue operating efficiently without losing any updates.
- Cache Pressure:
- When the cache usage approaches its limit, WiredTiger needs to make room for new data by evicting some existing pages.
- Using the LookAside Table:
- If a page in the cache has been updated but can’t be immediately written to disk (due to cache overflow), the updates are instead written to the LAS table (
WiredTigerLAS.wt). - This LAS table serves as an overflow area to temporarily store updates.
- If a page in the cache has been updated but can’t be immediately written to disk (due to cache overflow), the updates are instead written to the LAS table (
- Page Eviction:
- The updated page is then evicted from the cache.
- A pointer is added in memory indicating that this page has updates stored in the LAS table.
- Reading from LAS:
- If the page needs to be read again, WiredTiger will check the pointer and realize that it needs to fetch updates from the LAS table.
- When this happens, the entire history of updates stored in the LAS table for that page is loaded back into memory.
- This operation is “all or nothing”—the entire update history for the page is loaded, not just a portion of it.
db.serverStatus({tcmalloc:true})`
tcmalloc stands for Thread-Caching Malloc, which is a memory allocation library developed by Google. It’s a drop-in replacement for the standard C malloc function and is designed to be highly efficient and scalable.
In the context of MongoDB, tcmalloc is used to manage memory allocation for the WiredTiger storage engine. When you run the command db.serverStatus({tcmalloc:true}), you’re asking MongoDB to return statistics about the memory allocation and usage of the tcmalloc library.
The output will include information such as:
generic: general memory allocation statisticstcmalloc: specific statistics about thetcmalloclibrarypageheap_free_bytes: the number of free bytes in the page heappageheap_unmapped_bytes: the number of unmapped bytes in the page heapmax_total_thread_cache_bytes: the maximum total thread cache bytescurrent_total_thread_cache_bytes: the current total thread cache bytestotal_free_bytes: the total number of free bytescentral_cache_free_bytes: the number of free bytes in the central cachetransfer_cache_free_bytes: the number of free bytes in the transfer cachethread_cache_free_bytes: the number of free bytes in the thread cache
Admin cmd
db.adminCommand({buildInfo:true})db.adminCommand({hostInfo:true})
What is the admin Database in MongoDB?
In MongoDB, the admin database is the central administrative database. It’s not just another place to store your application’s data — it’s special because:
- It’s used for authentication, authorization, and administrative commands.
- It holds the root-level access credentials.
- It allows you to run commands that affect the whole MongoDB server, not just a single database.
Logs
db.adminCommand({getLog:'global'})Gets last 1024 entries (global :Combined output of all recent entries )
Profiling
The MongoDB profiler is a useful tool for troubleshooting and optimizing database performance. When enabled, it records operations in the system.profile collection, which can help identify slow queries, inefficient indexing, and other performance bottlenecks.
enabling the profiler comes with a performance cost. It can cause:
- Twice the writes: Each operation is written to the
system.profilecollection, in addition to the original write operation. - One write and one read for slow operations: When a slow operation is detected, the profiler writes the operation to the
system.profilecollection and also reads the operation from the collection to analyze it.
Note : MongoDB 4.4 and newer versions provide an alternative to the profiler: logs. You can use logs to capture slow operations and other performance-related data without incurring the additional write and read overhead associated with the profiler
MongoDB authentication mechanisms
Available in all versions
-
SCRAM(SaltedChallengeResponseAuthenticationMechanism): Default authentication mechanism.- Here MongoDB provides some challenge that user must respond to.
- Equivalent to Password Authentication
- Client requests a unique value (Nonce) from server
- Server sends nonce back
- Client hashes password, adds nonce and hashes hashed password+nonce again
- Server has hashed password saved
- Upon receiving end, server picks hashed password and hashes it + nonce it has sent to client.
- If both the hashes are equal, the login is successful.
-
X.509: Uses X.509 certificate for authentication.
Available in enterprise versions
LDAP(LightweightDirectoryAccessProtocall): Basis of Microsoft AD.- LDAP is sending plaintext data by default, TLS is required to make it secure.
KERBEROS: Powerful authentication designed by MIT.- Like
x509certificates but they are very short lived.
- Like
Available only in Atlas
MONGODB-AWS: Authenticate using AWS IAM roles.
Intra-cluster Authentication
- Two nodes in a cluster authenticate themselves to a Replica Set. They can either use
SCRAM-SHA-1by generating Key file and sharing key file between the nodes, (the approach used in replication labs).- If they use this key file mechanism user will be
__system@localand password will be generated keyfile
- If they use this key file mechanism user will be
- Or they can authenticate using
X.509certificates which are issued by same authority and can be separated from each other.
Authorization
- RBAC is implemented
- Each user has one or more roles
- Each role has one or more privileges
- Each privilege represents a group of actions and the resources where those actions are applied
- E.g. There are three roles,
Admin,DeveloperandPerformance Inspector Adminhas all the privileges.Developercan create, update collection, indices and data. They can also delete indices and data. But can not change any performance tuning parameter.Performance Inspectorcan view all the data and indices, can see and change performance tuning parameter.
Mongodb Version update
Feature Compatibility Version
Feature Compatibility Version. It’s a setting that determines which features of MongoDB are available to use, depending on the version of the MongoDB server.
Even if you upgrade your MongoDB server to a newer version (say from 5.0 to 6.0), the FCV might still be set to the older version (e.g., “5.0”). This allows your cluster to continue behaving like the older version until you’re ready to use the new features. This helps with:
- Safe upgrades/downgrades
- Backward compatibility
- Feature gating — newer features won’t be used until FCV is raised
db.adminCommand({ setFeatureCompatibilityVersion: "6.0" })Under the hood:
- Disables new features, locks out incompatible formats
MongoDB uses FCV to delay changes to how it stores data on disk.
- Upgrades might change collection metadata or index formats
- If you later decide to downgrade, older binaries won’t recognize the new formats
So until you raise FCV, MongoDB keeps using the old storage layout safer downgrades!
The Feature Compatibility Version (FCV) burn-in period isn’t meant to test new features or query behaviors. it’s meant to test the stability of the new MongoDB binary itself.
When you upgrade the MongoDB binary but keep the FCV at the old version:
- The new binary code (with bug fixes, performance changes, and internal optimizations) is running.
- But old query behavior and data formats remain in use.
This allows you to safely detect:
- Stability issues (crashes, memory leaks, replication bugs)
- Performance regressions (CPU/memory inefficiencies)
- Compatibility problems with your real data or infrastructure
If something breaks, you can easily revert to the old binary because no new data formats or features were activated yet.
Once the system proves stable, then you upgrade the FCV enabling new query features and data layouts. Doing both at once would make it hard to tell whether an issue comes from the new binary or new features, and rollback would be risky.
Resources
-
https://github.com/danielabar/mongo-performance?tab=readme-ov-file [ need to read from Performance on Clusters]
-
https://www.mydbops.com/blog/optimize-mongodb-storage-compression-indexing-and-ttl-best-practices
-
https://dev.to/franckpachot/mongodb-multi-planner-optimizer-and-plan-cache-3g27
-
https://medium.com/mongodb/your-guide-to-optimizing-slow-queries-f69cf413ee71
for(let i=0;i<100;i++){
      const largeObject = {
            name: 'Test Object',
            nested: {},
            array: []
        };

        for (let i = 0; i < 1000; i++) {
            largeObject.nested[`property${i}`] = 'x'.repeat(1000); // 1000 characters string
        }


        for (let i = 0; i < 1000; i++) {
            largeObject.array.push({ index: i, value: 'y'.repeat(1000) }); // 1000 characters string
        }


        const docs = Array(100).fill(largeObject);

    db.questions.insertMany(docs)
    }
To get DataSize
This returns a document with the size in bytes for all matching documents mentioned in keypattern on collection mentioned in dataSize
db.runCommand({
	dataSize: "database.collection",  //database -> databaseName
	keyPattern: { field: 1 },
	 min: { field: 10 },
	 max: { field: 100 } }
	)
Vertical sharding
- split by table
Horzontal sharding
- split by collection level
- mongos
- config server
- shards
Idea
- Try to convert index.wt file and print as json
SRV
SRV (Service) record is a type of DNS (Domain Name System) record that specifies the location of a server or service.
SRV Record Format:
An SRV record provides information about the hostnames and ports where the MongoDB instances are running. The format generally looks like this:
_service._proto.name. TTL class SRV priority weight port target.
For MongoDB, the connection string might look like this:
mongodb+srv://<username>:<password>@cluster0.mongodb.net/<dbname>?retryWrites=true&w=majority
How SRV Works in MongoDB
mongodb+srv://: The+srvpart in the connection string indicates that the driver should look for an SRV record to find the list of servers in the cluster.- Cluster Discovery: When you use an SRV record in the connection string, MongoDB automatically discovers the primary and secondary nodes in your cluster, making it easier to manage connections, especially in a sharded or replicated environment.
- Port Management: SRV records include the port number, so you don’t need to specify it separately in the connection string.
Full Time Diagnostic Data Capture
To help MongoDB engineers analyze server behavior, mongod and mongos processes include a Full Time Diagnostic Data Capture (FTDC) mechanism. FTDC is enabled by default.
FTDC collects statistics produced by the following commands on file rotation or startup:
mongod processes store FTDC data files in a diagnostic.data directory under the instances storage.dbPath
FTDC runs with the following defaults:
- Data capture every 1 second
- 200MB maximum
diagnostic.datafolder size.
Monogodb atlas private connection string
will create a srv record on the url
_mongodb._tcp.cluster0-pl-0.k45tj.mongodb.net
- when we dig it will give the domain which will give private IP of the mongodb
$ nslookup -type=SRV _mongodb._tcp.cluster0-pl-
0.k45tj.mongodb.netServer: 127.0.0.53Address: 127.0.0.53#53Non-authoritative answer:_mongodb._tcp.cluster0-pl-0.k45tj.mongodb.net service = 0 0 1026 pl-0-us-east-1.k45tj.mongodb.net._mongodb._tcp.cluster0-pl-0.k45tj.mongodb.net service = 0 0 1024 pl-0-us-east-1.k45tj.mongodb.net._mongodb._tcp.cluster0-pl-0.k45tj.mongodb.net service = 0 0 1025 pl-0-us-east-1.k45tj.mongodb.net.
- cluster0-pl-0.k45tj.mongodb.net will have private Ip
Keyhole
A tool to quickly collect statistics from a MongoDB cluster and to produce performance analytics summaries in a few minutes.
Security
Tools
- https://github.com/FranckPachot/mlab [ a docker image with grafana and metrics where we can setup locally to play around with mongodb]
Arrayfileters
db.students4.updateMany(
  {},
  { $inc: { "grades.$[t].questions.$[score]": 2 } },
  {
    arrayFilters: [
      { "t.type": "quiz" },
      { "score": { $gte: 8 } }
    ]
  }
)

will be replaced

"grades.type.questions.score
	-> filter the type quiz then
	-> fileter the score that filtered question who has gt 8
“
sudo python3 /var/lib/mongodb/wt_to_mb_bson.py -w /home/boopathik/Documents/OtherCode/wiredtiger/build/wt "file:index-12-17718008447513105512.wt"
wt_to_mb_bson.py
#!/usr/bin/env python3

import argparse
import bson
import codecs
import pprint
import subprocess
import sys
from bson.json_util import dumps, CANONICAL_JSON_OPTIONS

def print_bson(bson_obj, as_json):
    """Pretty print BSON object"""
    if as_json:
        return dumps(bson_obj, json_options=CANONICAL_JSON_OPTIONS)
    else:
        return pprint.pformat(bson_obj, indent=2).replace('\n', '\n  ')

def decode_index_file(wt_path, file_path, as_json=False, verbose=True):
    """
    Decode a MongoDB WiredTiger index file and display its contents.

    Args:
        wt_path: Path to the 'wt' utility binary
        file_path: Path to the .wt file to decode
        as_json: Output as JSON format
        verbose: Print detailed information
    """
    try:
        # Execute wt dump command
        cmd = [wt_path, "-r", "dump", "-x", file_path]
        if verbose:
            print(f"Executing: {' '.join(cmd)}", file=sys.stderr)

        output = subprocess.check_output(cmd, universal_newlines=True)
        lines = output.splitlines()

        if verbose:
            print(f"Total lines read: {len(lines)}", file=sys.stderr)

        # Find header and data sections
        header_end = -1
        data_start = -1

        for i, line in enumerate(lines):
            if line.strip() == 'Header':
                header_end = i
            if line.strip() == 'Data':
                data_start = i + 1
                break

        if verbose:
            print(f"Header section: lines 0-{header_end}", file=sys.stderr)
            print(f"Data section starts at: line {data_start}", file=sys.stderr)

        # Print header information
        if header_end > 0:
            print("=" * 80)
            print("INDEX FILE HEADER")
            print("=" * 80)
            for i in range(1, header_end):
                print(f"{lines[i]}")
            print()

        # Process data section - key-value pairs
        print("=" * 80)
        print("INDEX DATA (KEY-VALUE PAIRS)")
        print("=" * 80)

        if data_start < 0:
            print("ERROR: No Data section found in file!")
            return

        processed = 0
        failed = 0
        i = data_start

        while i < len(lines):
            # Each key-value pair takes 2 lines
            if i + 1 >= len(lines):
                if lines[i].strip():
                    print(f"\nWARNING: Incomplete pair at line {i}")
                    print(f"Remaining line: {lines[i][:100]}")
                break

            key_hex = lines[i].strip()
            value_hex = lines[i + 1].strip()

            # Skip empty lines
            if not key_hex or not value_hex:
                i += 2
                continue

            try:
                # Decode hex to bytes
                key_bytes = codecs.decode(key_hex, 'hex')
                value_bytes = codecs.decode(value_hex, 'hex')

                # Try to decode BSON
                try:
                    value_bson = bson.decode_all(value_bytes)[0]
                except:
                    # If value is not BSON, just show as hex
                    value_bson = {"_raw_hex": value_hex[:100] + ("..." if len(value_hex) > 100 else "")}

                # Try to decode key as BSON
                try:
                    key_bson = bson.decode_all(key_bytes)[0]
                    key_display = print_bson(key_bson, as_json)
                except:
                    # If key is not BSON, show as hex
                    key_display = key_hex[:100] + ("..." if len(key_hex) > 100 else "")

                # Print the pair
                print(f"\n[Entry {processed + 1}]")
                print(f"Key:")
                print(f"  {key_display}")
                print(f"Value:")
                print(f"  {print_bson(value_bson, as_json)}")

                processed += 1

            except Exception as e:
                print(f"\nERROR at line {i}: {e}")
                print(f"  Key (first 100 chars): {key_hex[:100]}")
                print(f"  Value (first 100 chars): {value_hex[:100]}")
                failed += 1

            i += 2

        # Summary
        print("\n" + "=" * 80)
        print(f"SUMMARY: {processed} entries decoded successfully, {failed} errors")
        print("=" * 80)

    except subprocess.CalledProcessError as e:
        print(f"ERROR executing wt utility: {e}", file=sys.stderr)
        sys.exit(1)
    except Exception as e:
        print(f"ERROR: {e}", file=sys.stderr)
        sys.exit(1)

def main():
    parser = argparse.ArgumentParser(
        prog='decode_mdb_index',
        description='Decode MongoDB WiredTiger index files and display their contents'
    )
    parser.add_argument('-w', '--wt-path',
        default='/home/boopathik/Documents/OtherCode/wiredtiger/build/wt',
        help='Path to WiredTiger wt utility (default: wt)')
    parser.add_argument('-j', '--json',
        action='store_true',
        help='Output as JSON format')
    parser.add_argument('-q', '--quiet',
        action='store_true',
        help='Suppress verbose output')
    parser.add_argument('file',
        help='Path to the .wt index file to decode')

    args = parser.parse_args()

    decode_index_file(
        wt_path=args.wt_path,
        file_path=args.file,
        as_json=args.json,
        verbose=not args.quiet
    )

if __name__ == "__main__":
    main()
INDEX will be
recordId (index key)
Internal Disk level
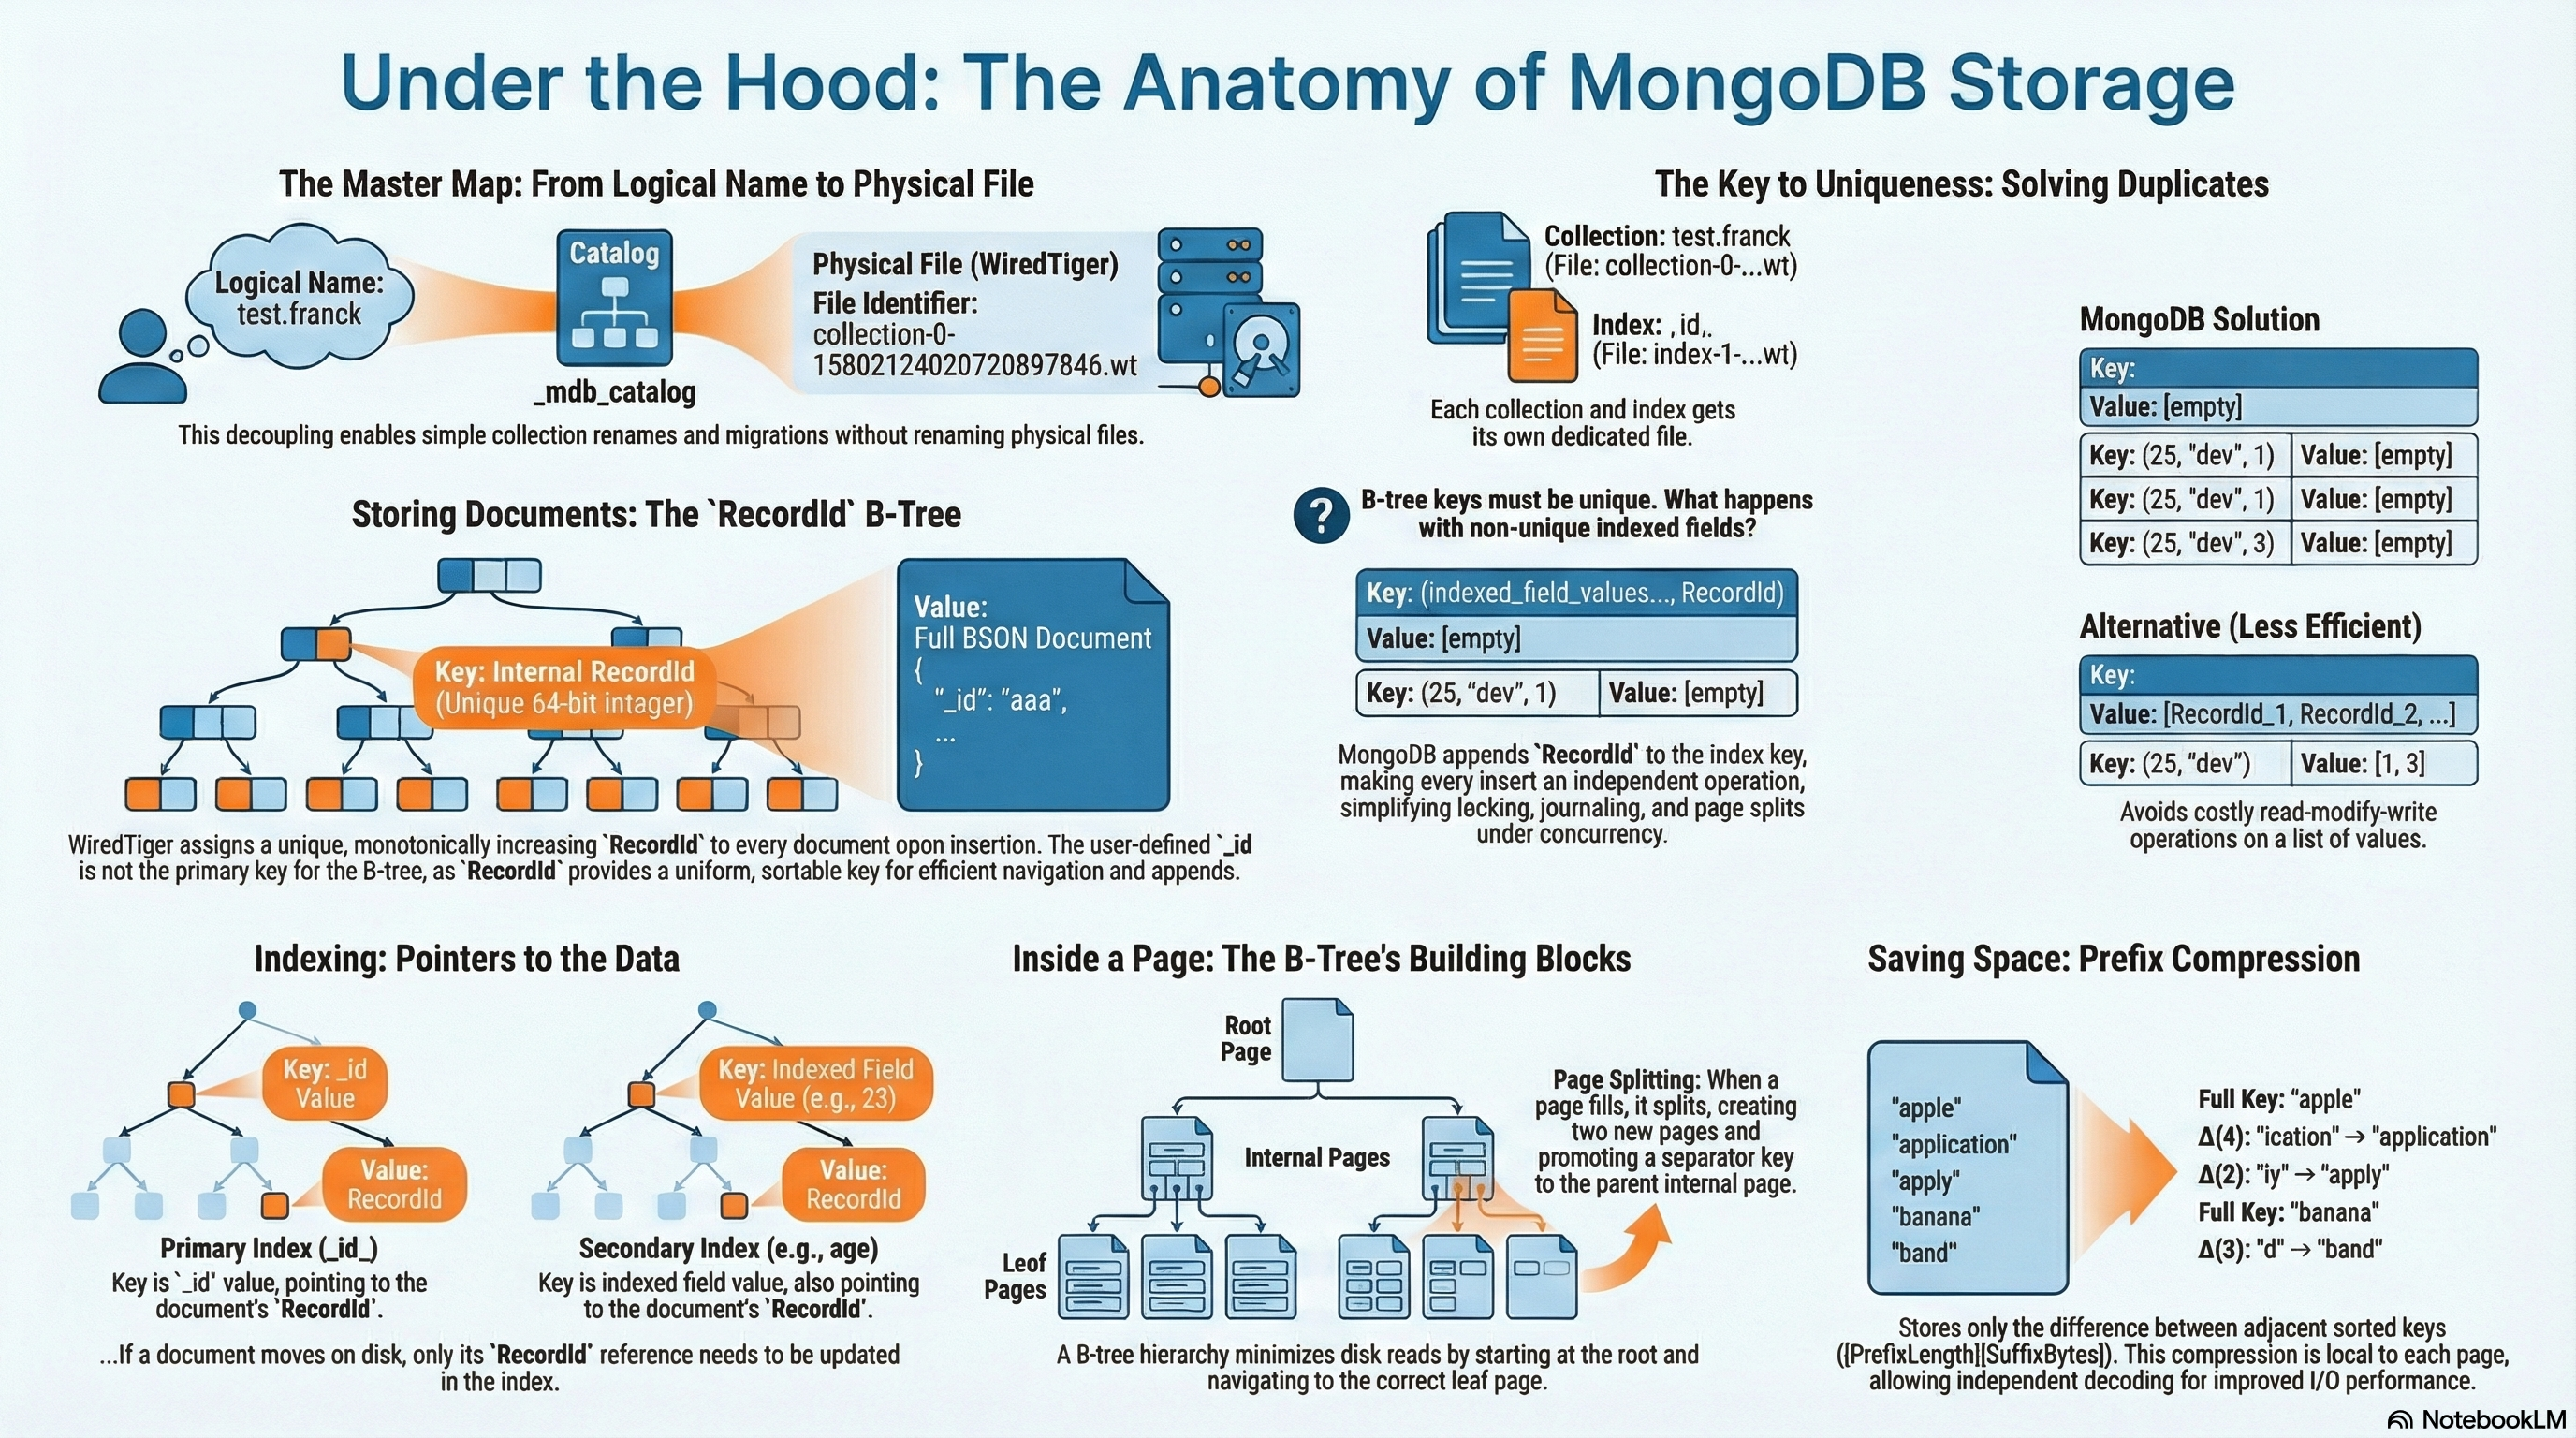
MongoDB uses a special table named _mdb_catalog inside WiredTiger to map between MongoDB “logical” collections/indexes and the underlying WiredTiger tables/files.
Mechanistically:
- For each MongoDB collection, there is a “table‐identifier” (called an ident) in WiredTiger, e.g.,
collection-0-15802124020720897846.wt.
-
For each index on that collection, there is another ident table, e.g.,
index-1-15802124020720897846.wt. -
The catalog holds entries of the form { ns: “test.franck”, ident: “collection-0-…”, idxIdent: { … } }.
Why this design?
- It decouples the logical name (“collection test.franck”) from the physical storage ident, which gives flexibility (renames, migrations, file layout).
- It allows the storage engine to treat all collections and indexes uniformly as “tables” inside WiredTiger (with B‐trees etc).
- It gives MongoDB a centralized place to ask: “For this collection, what ident/file do I use?” and “What indexes live here?”
What if it were designed differently?
- If MongoDB mapped collection names directly to file names, you’d lose flexibility (renames become harder, migration harder).
- If indexes were stored inline in the same file as the collection data (instead of in separate ident files), you might save files, but you’d increase complexity in data layout, locking, compaction, and index maintenance.
- If the catalog were distributed or decentralized (no single table), lookup cost and consistency might become harder.
Thus the current design strikes a balance: separate tables for separate concerns, catalog mapping, storage engine abstraction.
What is RecordId?
MongoDB collections are stored as key–value tables inside WiredTiger.
Each collection needs a way to uniquely identify and order its individual documents on disk.
We can’t use _id directly for this purpose because:
_idis arbitrary user data (can be ObjectId, string, int, etc.).- It’s not necessarily ordered or fixed-length.
- WiredTiger needs an internal, uniform, and sortable key to navigate the B-tree efficiently.
So MongoDB introduces a storage-level concept: RecordId.
A RecordId is an internal, monotonically increasing identifier assigned by WiredTiger to each document stored in a collection.
It acts as the primary key for the collection’s underlying B-tree
inside wt file it wil be like
Key (RecordId) → Value (BSON document bytes)
A RecordId is not a pointer or memory address.
It’s a small numeric key that WiredTiger uses to order documents on disk.
In MongoDB 4.x+ (WiredTiger):
- It’s a 64-bit integer.
- It increases with each inserted record (roughly sequential).
- This allows documents to be physically appended efficiently.
So the B-tree for the collection itself looks like:
(RecordId=1) → doc1
(RecordId=2) → doc2
(RecordId=3) → doc3
...
to view the recorId
db.getCollection('franck').find({}).showRecordId()
2.2 Collection storage (documents in B‐tree)
Mechanically:
-
The collection’s WiredTiger table (e.g.,
collection-0-...) is a B‐tree where:- Key = an internal recordId (a 64-bit unsigned integer) used by MongoDB, not the
_idfield necessarily. - Value = the BSON of the document (the full _id, fields, arrays) stored as value format in the B‐tree leaf.
- Key = an internal recordId (a 64-bit unsigned integer) used by MongoDB, not the
-
Example from article: they dump the table and get entries like:
{"key": "81", "value": { "_id": "aaa", … }}They note the “key” 81 corresponds to recordId = 1 (via some encoding).
Why this design?
- Using a simple integer recordId as the key preserves ordering, simplifies storage, and isolates document movement. MongoDB can move the document (in memory/disk) without changing its recordId, so indexes that point to recordId don’t break.
- Storing the full document BSON as the value means the storage engine deals with “key → blob” (makes design simpler).
- Using a B-tree means good performance for range scans, ordering by recordId, etc.
What if it were designed differently?
- If instead the key were the
_idvalue directly: then if you had a compound primary or non‐unique _id you’d run into complexity; also moving the document would change the key, invalidating pointers. - If instead of separate B‐tree per collection you had one monolithic store for all collections: you’d trade flexibility and isolation (e.g., easier compaction but more merge complexity).
- If you stored documents in a log structure (append only) instead of B-tree: you’d get faster writes but worse random reads and range scans.
2.3 Primary index storage
Mechanically:
- Every collection has a primary index on
_idcreated automatically. This is stored as a separate WiredTiger table (e.g.,index-1-...). - In that index table, Key = the
_idfield value; Value = the recordId of the document in the collection table. Example:<aaa\00\04 …>with the packed recordId value.
Why this design?
- Separating index from data ensures the B-tree for _id can remain lean, optimized for lookups by _id.
- The index pointing to recordId rather than physical location keeps the index stable even if the document moves.
- Using recordId ensures that indexes remain lightweight and reference‐only; they don’t duplicate the full document.
What if designed differently?
- If the index stored full pointers to physical file/offset instead of recordId, updating/moving documents would require updating all indexes—costly.
- If the index were stored in the same B-tree as the data (embedded): you might save one file but you’ll complicate updates, locking, and might degrade performance for index‐heavy workloads.
- If _id index were optional rather than mandatory: lookups by _id might become slower or inconsistent.
2.4 Secondary indexes & multikey array handling
Mechanistically:
- Secondary indexes (compound or single‐field) are also separate WiredTiger tables (e.g.,
index-2-...). - In these index tables, Key = concatenation of the indexed field(s) values (encoded in an “order‐preserving” format) plus, for non‐unique indexes, the recordId appended so entries remain unique.
- For array fields: If an indexed field is an array, MongoDB marks the index as multikey, and it will generate one index entry per array element (and combinations if multiple multikey fields).
Why this design?
- Having a separate table per secondary index keeps the index b‐tree tuned for the particular key structure (size, order, cardinality).
- Appending recordId for non‐unique ensures each index entry is unique in the b‐tree (since duplicates could otherwise exist if many docs have the same values).
- By marking multikey and recording which fields are multikey, the query planner can reason about bounds (e.g., “this field is array, so each element contributed an entry”). The storage engine needs to know this on‐disk.
What if designed differently?
- If you didn’t append recordId for non‐unique indexes, then duplicate index keys would force special handling (e.g., list of doc references in a value), complicating the tree logic.
- If arrays didn’t generate multiple entries (i.e., stored the array as a single key value), queries that search by element or bounds would be less efficient or inaccurate.
- If all indexes were packaged in one big table rather than separate ones, tree depth might increase, maintenance would be harder, and I/O patterns more mixed.
2.5 On‐disk and B‐tree details
Mechanistically:
- The article shows direct dumps of WiredTiger pages: leaf pages (page type: WT_PAGE_ROW_LEAF) containing cells for key/value pairs; branch pages (WT_PAGE_ROW_INT) storing ranges and child pointers with checksums.
- Keys and values are stored through “packed” or “order‐preserving” encodings: e.g., recordId encoded with bits shifted so length is encoded in top bits.
- Metadata files (WiredTiger.wt, .turtle) store engine‐level info. Collection sizes are stored in sizeStorer.wt.
Why this design?
- The B-tree page types allow efficient lookup (branch) and storage (leaf).
- Order‐preserving key encoding is vital so range queries on indexed fields or recordIds work correctly (the tree ordering corresponds to logical ordering).
- Storing metadata separately means maintenance tasks (like size tracking) don’t interfere with the main data tree.
- Checksums and internal metadata (e.g., writegen, memsize) help with crash resilience and integrity.
What if designed differently?
- If you used a hash table instead of B‐tree: lookups would be fast for equality, but range queries would suffer or be impossible.
- If you used no packed encoding and just raw values: the tree may not order keys correctly, or keys may take much more space, reducing cache/effectiveness.
- If metadata (size, namespace mapping) were stored inline in the main tables: you’d risk mixing concerns and reduce performance (metadata updates causing fragmentation of the main tree).
How index is stored
Each page (a node of the B-tree) is a contiguous region on disk:
┌───────────────────────────────────────────────┐
│ Page header                                   │
│   - page type (internal / leaf)               │
│   - page ID                                   │
│   - parent ID                                 │
│   - key count                                 │
│   - offsets table                             │
├───────────────────────────────────────────────┤
│ Key/value byte area                           │
│   (prefix-compressed entries packed tightly)  │
└───────────────────────────────────────────────┘
Two kinds:
- Internal pages: contain only key + child page IDs.
- Leaf pages: contain full key + value (for collections: BSON record; for indexes: RecordId).
A B-tree isn’t just a sorted list — it’s a hierarchical index designed to minimize disk reads.
Each page (node) holds multiple keys.
- Internal pages = “routing” or “directory” pages → they tell you which page to look at next.
- Leaf pages = where actual data lives (values, record references, etc).
So internal nodes exist purely to guide search they are shortcuts, not owners of real data.
Root (Internal)
 ├── Internal page
 │     ├── Leaf page
 │     └── Leaf page
 └── Internal page
       ├── Leaf page
       └── Leaf page
When we search
- Reads the root page (tiny, cached).
- Compares the key to a few separator keys inside root.
- Jumps directly to the relevant child page.
- Repeats until it reaches a leaf.
- Reads the RecordId from that leaf.
That last step gives the exact physical location of the document in the collection’s .wt file.
How internal page will be if we have multikey index
let say we have indexing key age and tag
WiredTiger stores keys and values as byte arrays, not BSON.
Each field is serialized in type tagged little-endian binary, then concatenated.
Example key for (age=25, tag="dev", recordId=0x0002) might be encoded like:
25 (int32)  → 19 00 00 00
"dev"       → 03 64 65 76 00
recordId    → 02 00 00 00 00 00 00 00
The resulting key bytes:
19 00 00 00 03 64 65 76 00 02 00 00 00 00 00 00 00
In index the value is empty
Why does MongoDB encode the RecordId as part of the key, rather than store it as the value of the index entry?
A B-tree must keep all keys sorted. Every key is used for navigation — determining which branch or page to follow during a search.
So the order of keys defines:
- Range scan boundaries,
- Split positions,
- Merging conditions.
Only the key portion participates in sorting or comparison. The value portion is opaque payload — it’s not used for ordering or traversal.
That’s fundamental to how B-trees are defined.
What we need in a MongoDB index
Suppose we have a secondary index on {age, tag}.
Two documents:
Doc1: {age:25, tag:"dev"}   RecordId=1
Doc2: {age:25, tag:"dev"}   RecordId=3
If we use (age, tag) as the key, and store RecordId as the value,
the tree would look like:
| Key | Value |
|---|---|
| (25, “dev”) | 1 |
| (25, “dev”) | 3 |
But here’s the immediate problem:
B-tree keys must be unique.
These two entries have identical keys (25,"dev").
You cannot store them both — one would overwrite the other.
You could try to store “multiple values per key” (like a list of RecordIds), but that’s a different data structure — a multi-map — and is much more complex to maintain (we’ll see why).
What happens during an insert
When inserting into the index, WiredTiger must:
- Find where the new key fits (binary search),
- Maintain sorted order,
- Maybe split pages.
If the key is (25, "dev") and we already have one,
the engine can’t distinguish between the two documents unless the key itself encodes uniqueness.
So MongoDB defines the full key as:
(index fields..., RecordId)
That makes every index entry unique by construction.
| Key | Value |
|---|---|
| (25, “dev”, 1) | [empty] |
| (25, “dev”, 3) | [empty] |
Now both can coexist because the RecordId is part of the sort key.
Why not store RecordId as value with “duplicate key list”?
You could design it that way:
Key: (25, "dev") → Value: [1, 3]
But this causes major mechanical issues inside WiredTiger:
-
Large list updates: Each time you insert a new document with same key, you’d have to read–modify–write the entire list
[1, 3, …].That’s a big serialized blob stored in the leaf page — very inefficient under concurrent updates.
-
Split boundaries break: The unit of splitting in a B-tree is an individual key/value pair. You can’t split “inside” a value (you can’t put half of
[1,3,4,5,…]in one page and half in another).So large duplicate lists cause page fragmentation and hot spots.
-
Concurrency and journaling cost: Every insert touching a shared value list triggers locks, journal rewrites, and cache invalidations.
By instead encoding the RecordId into the key,each document insert is an independent key/value pair. Splits, merges, and updates remain local and O(log n).
How pages are linked and found
Every page has a numeric page ID.
Internal pages form the directory:
Internal Page 100
  [ (25,"dev") → Leaf 200 ]
  [ (30,"music") → Leaf 201 ]

Leaf 200
  (25,"art",rec1) → val
  (25,"dev",rec1) → val
  (25,"dev",rec2) → val
  (25,"music",rec2) → val
When we insert a new key, WiredTiger:
- Traverses internal pages to the target leaf.
- Inserts the encoded key bytes in sorted position.
- If the leaf overflows its page size → split into two pages and update parent pointers.
These splits happen in-place without rewriting the whole index file.
Root Page
├── Internal Page A : keys < 13
│   ├── Leaf 1 : days [1–6]
│   └── Leaf 2 : days [7–12]
├── Internal Page B : 13 ≤ day < 25
│   ├── Leaf 3 : days [13–18]
│   └── Leaf 4 : days [19–24]
└── Internal Page C : 25 ≤ day ≤ 36
    ├── Leaf 5 : days [25–30]
    └── Leaf 6 : days [31–36]
                               [ Root Page ]
           ┌────────────────────┬────────────────────┬────────────────────┐
           │ (split @13)        │ (split @25)        │                    │
           ▼                    ▼                    ▼
   [Internal A]          [Internal B]          [Internal C]
   (<13)                 (13–24)               (25–36)
   ├────────────┐         ├────────────┐         ├────────────┐
   ▼            ▼         ▼            ▼         ▼            ▼
Leaf1         Leaf2    Leaf3         Leaf4    Leaf5         Leaf6
(1–6)         (7–12)   (13–18)      (19–24)  (25–30)      (31–36)
How mongodb split the page
When inserting, MongoDB keeps each page sorted by key order.
As soon as adding a new key/value pair would exceed the page’s size limit, WiredTiger must split that page into two, to maintain these properties:
- Each page fits in its maximum size,
- Keys remain sorted globally,
- And the tree remains balanced (all leaves at same depth).
Let’s assume:
- Page size limit = 32 KB.
- Current leaf is full, say it has 200 keys.
- We’re inserting a new key that pushes it over the limit.
The algorithm:
- Compute the split point — roughly the middle of the page (by byte size, not by number of records).
- WiredTiger measures total serialized key/value bytes.
- Once ~½ the bytes have been counted, that becomes the split boundary.
- Create two new leaf pages:
- Left page gets all entries
< split_key. - Right page gets all entries
≥ split_key.
- Left page gets all entries
- Insert the split_key (the lowest key of the right page) into the parent (internal) node, pointing to the new right page.
Prefix compression
Imagine a sorted index on a field like "name".
When data is sorted lexicographically, nearby keys share long common prefixes:
["apple", "application", "apply", "appoint", "banana", "band", "bandit"]
Without compression, every key is fully stored in the leaf page:
| Key stored | Bytes |
|---|---|
| apple | 5 |
| application | 11 |
| apply | 5 |
| appoint | 7 |
| banana | 6 |
| band | 4 |
| bandit | 6 |
| Total | 44 bytes just for the strings |
But look closely: the first four keys all start with "app", the next three start with "ban".
So most bytes are redundant.
Step 2. Observation — sorted order gives prefix locality
Because the B-tree keeps all keys sorted, keys that share prefixes end up adjacent in the same page.
That makes it possible to store only the difference (“delta”) from the previous key — the common prefix doesn’t need to be repeated.
So instead of full keys, we can store:
(0, "apple")
(4, "ication")    ← shares 4 chars "appl"
(3, "ly")         ← shares 3 chars "app"
(3, "oint")       ← shares 3 chars "app"
(0, "banana")     ← no shared prefix
(3, "d")          ← shares 3 chars "ban"
(4, "it")         ← shares 4 chars "band"
Here each entry says:
“share X chars with previous key, then append these remaining characters.”
So WiredTiger stores prefix length + suffix bytes.
Step 3. How WiredTiger actually encodes it
Each key is encoded in this format inside a B-tree page:
[PrefixLength][SuffixBytes]
For example, if previous key = "application", and next key = "apply",
then WiredTiger stores:
PrefixLength = 4
SuffixBytes = "ly"
When reconstructing the key:
ReconstructedKey = PrevKey[0:PrefixLength] + SuffixBytes
                 = "appl" + "ly" = "apply"
The decompression happens on demand when reading a key from the page.
Step 4. What this looks like in a leaf page
Suppose a leaf page stores these sorted index keys (simplified):
| Offset | Stored data | Expanded key | RecordId |
|---|---|---|---|
| 0 | [0]“apple” | apple | 1 |
| 1 | [4]“ication” | application | 2 |
| 2 | [3]“ly” | apply | 3 |
| 3 | [3]“oint” | appoint | 4 |
| 4 | [0]“banana” | banana | 5 |
| 5 | [3]“d” | band | 6 |
| 6 | [4]“it” | bandit | 7 |
So in memory, the B-tree leaf might contain something like:
[0,"apple"][4,"ication"][3,"ly"][3,"oint"][0,"banana"][3,"d"][4,"it"]
That’s much smaller than storing all keys literally.
Step 5. Why not compress arbitrarily?
Prefix compression only works within a leaf page, because:
- Decompressing across pages would require reading neighboring pages (bad for I/O locality).
- Page boundaries are logical cut points — each page can be decoded independently.
So each page begins with the first key fully stored, and subsequent keys are stored as prefixes relative to the previous key within that page only.
Step 6. What happens on page split
When a page becomes too full, WiredTiger splits it:
- Half of the entries move to a new page.
- Both pages recompute prefix compression independently.
- Internal nodes get one “separator key” — which is typically the first key of the right page, fully expanded.
This keeps the compression local but consistent.
Quick visual model
┌──────────────────────────────┐
│  B-tree Leaf Page            │
├──────────────────────────────┤
│ Full key: "apple"            │
│ Δ(4): "ication"  → "application" │
│ Δ(3): "ly"       → "apply"       │
│ Δ(3): "oint"     → "appoint"     │
│ Full key: "banana"            │
│ Δ(3): "d"        → "band"       │
│ Δ(4): "it"       → "bandit"     │
└──────────────────────────────┘
Prefix compression in MongoDB context
MongoDB’s WiredTiger uses this in:
- Collection data (
_idindex): compresses primary keys. - Secondary indexes: compresses compound keys like
(age, tag, RecordId).
Example — for index on (age, tag, RecordId):
(25,"art",1)
(25,"art",2)
(25,"dev",1)
(25,"dev",2)
(25,"music",1)
(30,"music",3)
Stored compressed:
[0](25,"art",1)
[2](,””,2)         ← shares 2 fields (age=25,tag="art")
[1](,”dev”,1)
[2](,””,2)
[1](,”music”,1)
[0](30,"music",3)
Here prefix length is measured in serialized key bytes, not just fields.