
An inference engine is a specialized runtime designed to execute trained models efficiently on hardware. Between a trained model, which is usually in its default PyTorch (.pt), TensorFlow (.tf2) format, and a serving framework such as NVIDIA Triton Inference Server, FastAPI, TorchServe, BentoML, or Tensorflow Serving, there is an inference engine.
An inference engine optimizes a model to balance latency, throughput, precision, and efficiency for it in a production scenario.
Commonly, inference engines do one or more of the following:
-
Graph Optimization
It analyzes the computational graph of the model and applies optimizations to reduce the graph size and depth, fusing model layers or removing redundant computations. -
Hardware-Specific Optimization
Models could be compiled for target hardware accelerators such as CPU, GPU, TPU, or custom accelerators, by selecting highly tuned compute kernels for each architecture in part. -
Lowering Precision
Reduces the memory footprint by quantizing layers’ precision (e.g., FP32 → FP16 → INT8/INT4). -
Model Pruning & Sparsity
Pruning redundant weights or exploiting sparsity in matrices.
Inference Engines and Inference Frameworks
- ONNX and ONNX Runtime
- TensorRT, TensorRT-LLM
- vLLM, vLLM + LMCache
- vLLM + Ray
- llama.cpp
- GGML (which is llama.cpp and whisper.cpp)
- ggml is a machine learning (ML) library written in C and C++ with a focus on Transformer inference.
- Ollama
- NVIDIA Triton Inference Server
- HuggingFace TGI (Text-Generation Inference)
- CoreML
- OpenVINO, OpenVINO GenAI for Intel Hardware
- WebLLM is a high-performance in-browser LLM inference engine that brings language model inference directly onto web browsers with hardware acceleration
- MLC LLM compiles and runs code on MLCEngine — a unified high-performance LLM inference engine across the platforms
Distributed GenAI Inference Frameworks 1. NVIDIA Dynamo 2. vLLM + llm-D (Kubernetes) 3. AirBrix 4. Mojo and Mojo MAX Engine
he “frontend” of the compiler (TorchDynamo) attempts to turn Python bytecode into a computation graph
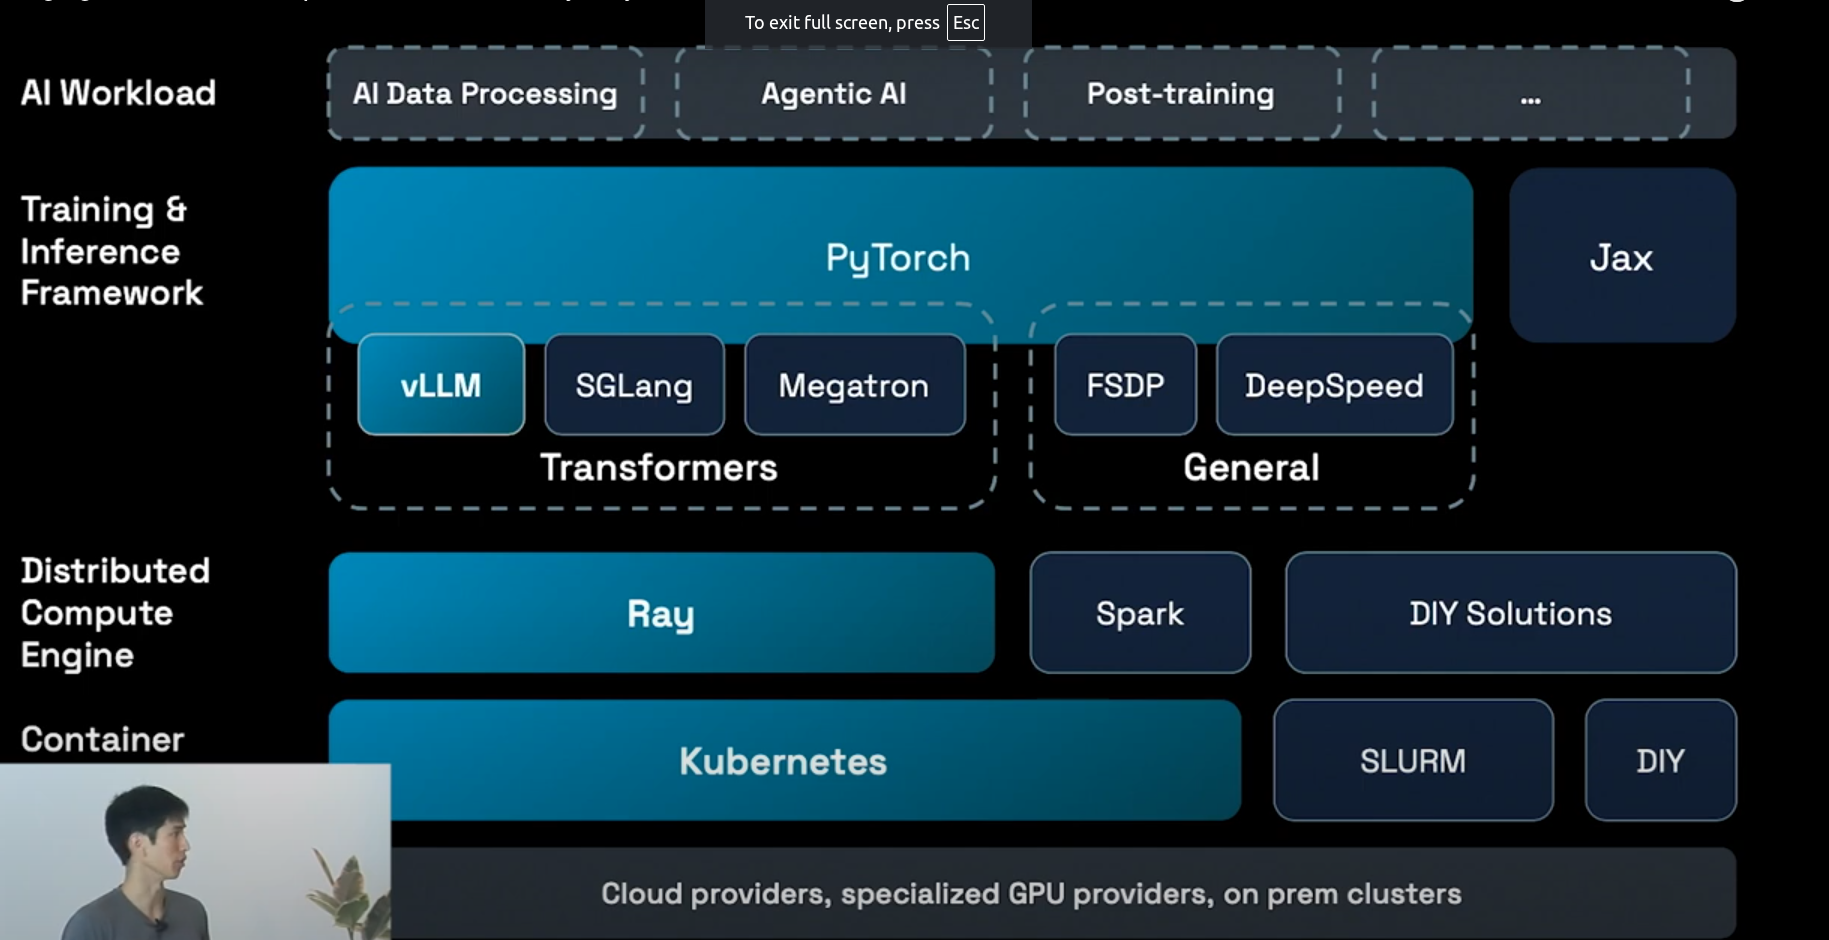
Why autoregressive is stuck being sequential
In a normal LLM, each token is sampled from a probability distribution that depends on all previous tokens. To generate token #5, you need token #4 to exist first. To generate token #4, you need token #3. It’s a chain.
Mathematically: P(token_5 | token_1, token_2, token_3, token_4)
You literally cannot compute this until token_4 is decided. That’s the bottleneck.
Inference Optimization
KV caching
Before a language model like GPT can understand or generate text, raw input text must be transformed into a format it understands tokens.
Tokenization
When we give GPT a sentence like:
text = "The quick brown fox"
inputs = tokenizer(text, return_tensors="pt")
The tokenizer:
- Breaks the sentence into subword units (tokens).
- Maps them to integers using a pre-trained vocabulary (e.g., 50,257 entries in GPT-2).
- Returns:
   {
   'input_ids': tensor([[464, 2068, 1212, 4417]]),
   'attention_mask': tensor([[1, 1, 1, 1]])
   }
Each token ID (like 464) corresponds to a word or part of a word.
What Happens Inside the Model
Once the input is tokenized, it’s passed to the model:
outputs = model(**inputs)
logits = outputs.logits
The output will have 50257 vocablity and each token with there attention score
| Text | vocab1 | vocab1 |
|---|---|---|
| input text1 | 10.39 | 10.9 |
| input text 2 | 10.31 | 9.8 |
Output of the Model
logitsshape:(batch_size, seq_len, vocab_size)- Each position contains a vector of size equal to the vocabulary size.
- These are unnormalized scores for predicting the next token.
Example:
logits.shape = torch.Size([1, 4, 50257])Here:
- 1 = batch size
- 4 = sequence length
- 50257 = number of possible tokens
You can get the most probable next token using:
last_logits = logits[0, -1, :]
next_token_id = last_logits.argmax()
Vocabulary Explained
The model has a fixed vocabulary (e.g., 50,257 tokens in GPT-2), learned during training.
- Tokens can represent words, subwords, punctuation, or whitespace.
- The model only generates tokens from this fixed vocabulary.
- It cannot invent new words or characters only sequences of known tokens.
tokenizer.decode(464) ➝ 'The'
tokenizer.decode(next_token_id) ➝ ' lazy'
Manual Token Generation: One-by-One
You can simulate generation manually:
for _ in range(10):
    next_token_id = generate_token(inputs)
    inputs = update_inputs(inputs, next_token_id)
    generated_tokens.append(tokenizer.decode(next_token_id))
This is auto-regressive generation each new token depends on the full previous sequence.
Why It’s Slow Without Caching
Each time we generate a new token:
- We re-feed the entire input sequence to the model.
- Attention layers recompute everything from scratch.
- This becomes increasingly expensive as the input grows.
Key-Value Caching (KV Caching)
Each transformer attention layer internally computes:
- Keys (K) and Values (V) for every token.
These are used to compute attention over the sequence:
Attention(Q, K, V) = softmax(QKᵀ / √d) * VThe trick: once we’ve computed K and V for earlier tokens, we don’t need to recompute them.
Example with KV-Caching
# First step
next_token_id, past_key_values = generate_token_with_past(inputs)

# Following steps
inputs = {
    "input_ids": next_token_id.reshape(1, 1),
    "attention_mask": updated_mask,
    "past_key_values": past_key_values
}
Now the model only computes attention for the new token — the old tokens are already cached.
Prefix caching
- During prefill, the model performs a forward pass over the entire input and builds up a key-value (KV) cache for attention computation.
- During decode, the model generates output tokens one by one, using the cached states from the prefill stage. The attention mechanism computes a matrix of token interactions. The resulting KV pairs for each token are stored in GPU memory.
- For a new request with a matching prefix, you can skip the forward pass for the cached part and directly resume from the last token of the prefix.
important
This works only when the prefix is exactly identical, including whitespace and formatting. Even a single character difference breaks the cache.
For example, consider a chatbot with this system prompt:
You are a helpful AI writer. Please write in a professional manner.
This prompt doesn’t change from one conversation to the next. Instead of recalculating it every time, you store its KV cache once. Then, when new messages come in, you reuse this stored prefix cache, only processing the new part of the prompt.
Prefix caching can reduce compute and latency by an order of magnitude in some use cases.
- Anthropic Claude Sonnet offers prompt caching with up to 90% cost savings and 85% latency reduction for long prompts.
- Google Gemini discounts cached tokens and charges for storage separately.
- Frameworks like vLLM, TensorRT-LLM, and SGLang support automatic prefix caching for different open-source LLMs.
In agent workflows, the benefit is even more pronounced. Some use cases have input-to-output token ratios of 100:1, making the cost of reprocessing large prompts disproportionately high.
Input Batching
Batching means feeding multiple input sequences to the model at the same time instead of one-by-one.
we have multiple prompts:
prompts = [
    "The quick brown fox jumped over the",
    "The rain in Spain falls",
    "What comes up must",
]
We tokenize them together:
inputs = tokenizer(prompts, padding=True, return_tensors="pt")This returns a tensor of shape [batch_size, seq_len], where:
Each row is a tokenized prompt.
All rows are padded to match the longest prompt.
input_ids:
tensor([[ 464, 2068, 1212, 4417, 716, 262],
        [ 464, 1619, 287, 743, 5792,    0],
        [ 1332, 1110, 389, 5016,    0,    0]])
In transformers, each token is aware of its position in the sequence using position_ids.
With padding, we must offset position IDs so they begin at 0 after the padding:
position_ids = attention_mask.cumsum(-1) - 1
position_ids.masked_fill_(attention_mask == 0, 1)
Continuous batching.
Refere above Continuous Batching from Ray serve
Dynamo
A Datacenter Scale Distributed Inference Serving Framework
TensorRT-LLM
TensorRT-LLM provides users with an easy-to-use Python API to define Large Language Models (LLMs) and support state-of-the-art optimizations to perform inference efficiently on NVIDIA GPUs. TensorRT-LLM also contains components to create Python and C++ runtimes that orchestrate the inference execution in performant way.
ZML
ZML simplifies model serving,
ensuring peak performance and maintainability in production.
VLLM
Paged Attention
Assume we have:
- A GPU
- One LLM
- One request
- You generate tokens one by one
For every token, at every layer, we must store two tensors:
- K (keys)
- V (values)
Because future tokens must attend to past tokens.
So after 5 tokens, memory looks like:
Token 0 → K0, V0
Token 1 → K1, V1
Token 2 → K2, V2
Token 3 → K3, V3
Token 4 → K4, V4
So far so good.
Now imagine:
- 100 users
- Each has a different prompt length
- Each generates tokens at different speeds
- All share one GPU
GPU memory must now hold KV for many sequences, all growing at different times.
“For each request, store KV in one continuous tensor.”
But this breaks because:
- Sequences grow token by token
- GPU memory does not like resizing
- Copying tensors every token is very expensive
CUDA block
In vLLM, a CUDA block is simply:
A fixed-size chunk of GPU memory that can store KV for a small number of tokens
Example:
- One block stores KV for 16 tokens
- Size never changes
- All blocks are identical
Visualize GPU memory like this:
[ Block 0 ][ Block 1 ][ Block 2 ][ Block 3 ][ Block 4 ] ...
Now take one user request.
Token generation starts Token 0
- Put its KV into Block 0 Token 1
- Still space → same block
Token 15
- Block full Token 16
- Get a new empty block
- Write KV there
So the sequence now owns:
Sequence A → [ Block 0, Block 5 ]
- Blocks are not required to be adjacent
- They can be anywhere in GPU memory
Attention needs:
“Give me all past K and V for this sequence.”
But memory is not continuous.
So vLLM’s attention kernel does:
for each block in block_table:
    read K, V from that block
It stitches the blocks together logically, without copying.
This is why it’s called Paged Attention.
What happens when a sequence finishes
- Returns all blocks used by that sequence
- Marks them as free
Memory reuse is instant.No cleanup cost.
Ray serve
Ray Serve scales each model independently based on its traffic. This applies across multiple nodes and models.
When traffic increases, Serve automatically adds replicas of models and can even start new instances to meet demand, scaling up models receiving traffic.
Crucially, Serve does not scale models that are not receiving traffic, preventing wasted GPU resources.
When traffic decreases, Serve automatically downscales models and removes extra nodes, saving GPU resources overnight. This simple optimization can lead to a 50% cost saving compared to allocating a fixed number of GPUs for peak traffic
Model Layer Optimizations with Ray Serve
Imagine you have a language model that needs to generate completions for three different prompts. The prompts and their expected token lengths are as follows:
- Prompt 1: “2+2=4” → 10 tokens (s1,s1,S1)
- Prompt 2: “How are neutron stars formed?” → 100 tokens
- Prompt 3: “What is the capital of France?” → 12 tokens
Let’s assume the GPU can handle 2 sequences at a time. Now let’s see how static batching and continuous batching would handle this.
In static batching, you would put all three sequences into one batch. The model starts processing the batch, and it needs to wait for the longest sequence (Prompt 2, with 100 tokens) to finish.
- Prompt 1 (10 tokens) finishes quickly. But the GPU cannot process anything else yet because it’s waiting for the longest sequence.
- Prompt 3 (12 tokens) finishes next, but again, the GPU still waits for Prompt 2 to finish.
- Finally, Prompt 2 (100 tokens) finishes after a long time, and only then can the batch be considered complete.
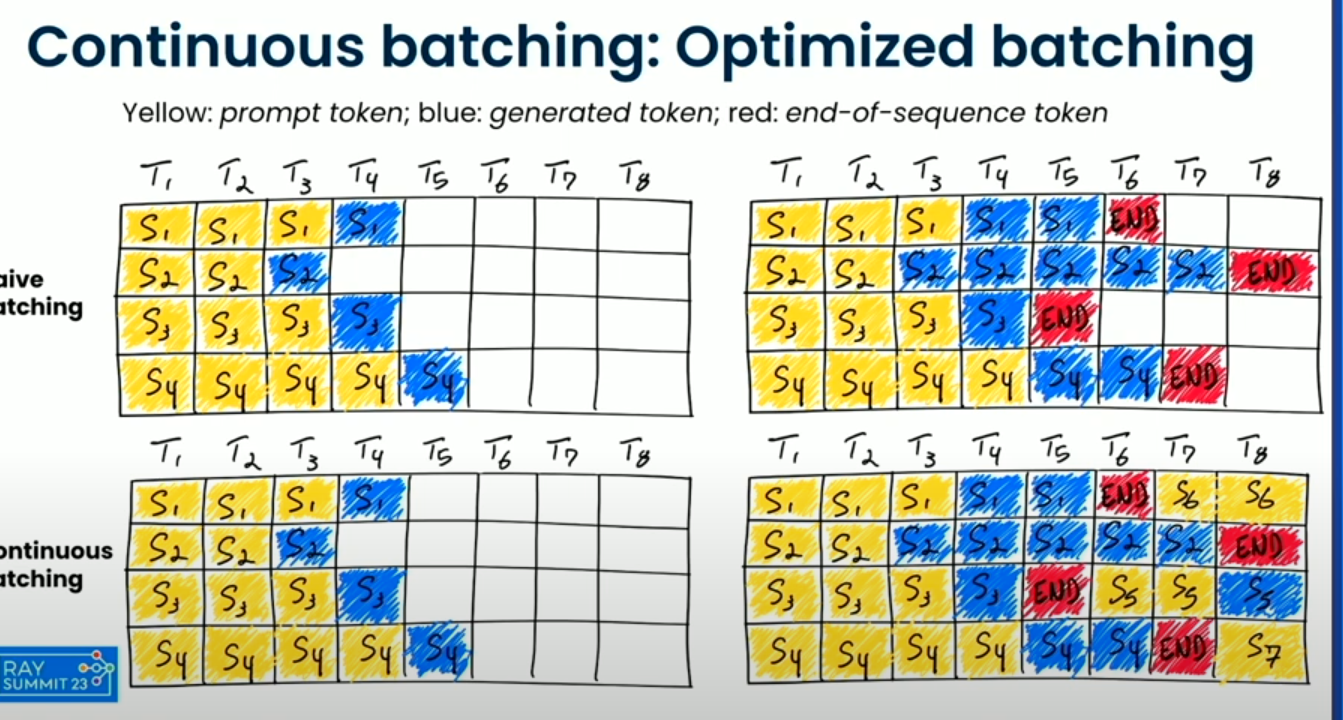
Continuous Batching: Instead of waiting for the entire batch to finish, in continuous batching, after each forward pass, the GPU processes one sequence and replaces it with a new sequence that’s waiting to be processed. So, after processing Prompt 1 (which finishes quickly), the GPU immediately starts processing Prompt 3.
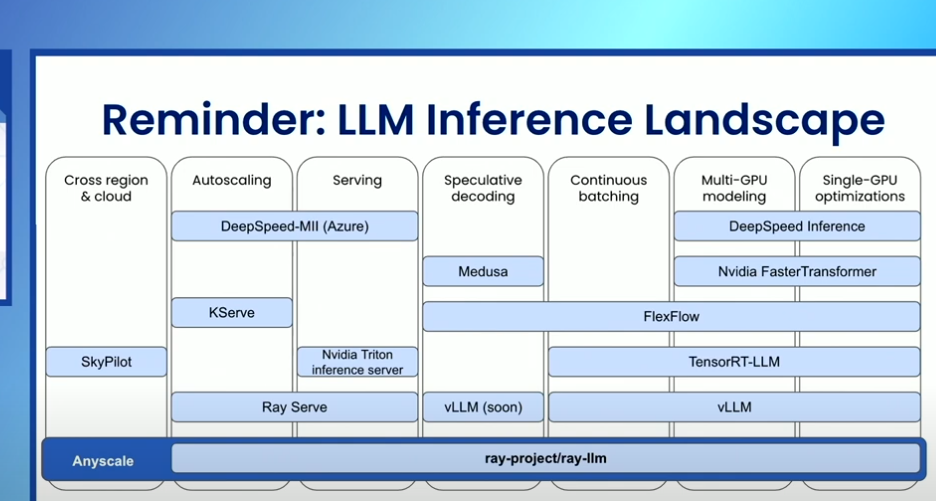
- Ray sever contain all best opensource features in single lib as mentioned in picture
Speculative decoding
Speculative decoding is an optimization technique designed to reduce the time it takes for a language model to generate each token, making it faster and more efficient. The core idea behind speculative decoding is that predicting tokens in a sequence isn’t equally difficult for every token. Some tokens are easier to predict based on the preceding context, while others might require more computational power and time to determine.
To speed up token generation, speculative decoding uses a smaller, faster model (referred to as a “draft” model). For example, a smaller 7-billion parameter model can be up to 10 times faster than a much larger 70-billion parameter model. The smaller model is tasked with predicting a few tokens ahead (let’s say K tokens), which is much faster than waiting for the large model to generate tokens one by one.
Once the smaller model makes predictions, the larger model (which has more capacity and accuracy) steps in to verify the correctness of the predicted tokens. If the smaller model’s predictions are correct, the larger model can immediately accept those tokens and even generate multiple tokens in a single forward pass. This means that the large model doesn’t have to compute every token individually, which reduces the overall time it takes to generate the output.
Note: Eventhough we use Large LLM for verification which is faster then LLM inference
SGLang has implemented this as egale 3 framework
Example
Traditional Speculative Decoding:
- Draft model: Small model (e.g. LLaMA 1B)
- Target model: Full model (e.g. LLaMA 7B/8B)
- The draft model generates k tokens.
- The target model checks if those k tokens are correct.
Eagle 3: Reuse the first few layers of the target model as the draft model
No need to load a separate model Just run:
- Layers 0–N for draft
- Layers N+1–L for verification
This saves memory and reduces latency + I/O overhead.
- A full LLaMA 8B model with 32 layers
- We configure Eagle 3 to use layers 0–7 as the draft
- We’ll decode up to 4 tokens per speculative round
User prompt: "Tell me a joke"

with torch.no_grad():
    hidden_state = model.run_layers(input_ids, layer_range=(0, 7))  # Layers 0 to 7
    logits = head(hidden_state[-1])  # output of layer 7
    draft_tokens = sample_tokens(logits, top_k=20, num_tokens=4)
Now we have 4 speculative tokens:
["Why", "did", "the", "chicken"]
Now we pass the combined input (prompt + draft_tokens) through only layers 8–32:
hidden_state = model.run_layers(
    input_ids=concatenate(prompt, draft_tokens),
    layer_range=(8, 32),
    reuse_cache=True
)
logits = head(hidden_state[-1])
then we check
Are model logits[0] == draft_tokens[0]?
Are model logits[1] == draft_tokens[1]?
          ┌──────────────────────────────┐
Prompt → │ LLaMA layers 0–7 (Draft pass) │
          └────────────┬────────────────┘
                       │  Sample top-K → draft tokens: ["Why", "did", "the", "chicken"]
                       ↓
          ┌──────────────────────────────┐
          │ LLaMA layers 8–32 (Verify)   │ ← prompt + draft tokens
          └────────────┬────────────────┘
                       ↓
         Check if target logits match draft
         ✔ If match → accept
         ✘ If mismatch → reject and resume
DFlash: Block Diffusion for Flash Speculative Decoding
What diffusion does differently
Diffusion models are trained on a totally different task. During training, they take a real sentence, randomly replace some words with [MASK], and learn to predict the masked words all at once, in a single forward pass.
Training example:
Original:  The cat sat on the mat quietly today
Masked:    The [M] sat on [M] mat [M] today
Predict:   cat, the, quietly  ← ALL predicted simultaneously
The model never learns “predict left-to-right.” It learns “given some visible context with holes, fill in all the holes at once.”
Here’s the under-the-hood part that makes it click. A transformer processes a sequence by computing attention between every position and every other position. When you feed in [token, MASK, MASK, MASK, ..., MASK]:
- Position 1 (the real token) attends to itself.
- Position 2 (MASK) attends to position 1 and positions 3-16.
- Position 3 (MASK) attends to position 1, position 2, and positions 4-16.
- … and so on.
Every position computes its output in the same forward pass, using GPU matrix multiplications. The GPU doesn’t care that some inputs are MASK tokens — it’s just doing matrix math on vectors. After one pass, every MASK position has a probability distribution over vocabulary, and you sample all of them.
This is the magic: the cost of generating 1 token and 16 tokens is essentially the same forward pass. You’re paying for the matrix multiplications anyway; you might as well fill in 16 slots instead of 1.
Why this seems like cheating (and isn’t, quite)
You might object: “But the predictions for position 5 and position 8 don’t see each other’s actual values! How can they be coherent?”
You’re right — they can’t fully. This is exactly why pure diffusion LLMs have historically been worse than autoregressive ones at end-to-end generation. The tokens can be slightly inconsistent with each other because each one was guessing in parallel without seeing the others’ final choices.
This is why DFlash uses diffusion only for drafting, not final output. The drafter produces a “best guess” block that’s mostly coherent. Then the target model — the real autoregressive one — checks it. The drafter doesn’t need to be perfect; it just needs to be right often enough that verification accepts most of its tokens.
This is the deepest “aha” moment in speculative decoding. The verification step looks expensive but is actually almost free. Here’s why.
The key insight: a transformer forward pass costs ~the same for 1 token or 16 tokens
When the target model normally generates 16 tokens autoregressively, it does 16 separate forward passes, one per token. Each pass:
- Loads the model’s billions of parameters from GPU memory into compute units
- Computes attention over the growing context
- Produces one token’s probability distribution
Step 1 — loading parameters — is the dominant cost for big LLMs. This is what people mean when they say LLM inference is “memory-bound, not compute-bound.” You’re moving gigabytes of weights from VRAM to compute cores, and the actual math is fast once the weights arrive.
So when you do 16 sequential passes, you load all those parameters 16 times.
Verification does it once
In a verification pass, the target model takes the full sequence [context + draft_token_1, draft_token_2, ..., draft_token_16] and runs one forward pass. In that single pass, the model loads its weights once and computes the probability distribution at every position simultaneously.
Concretely, the model outputs:
- At position of token 1: “what would I have predicted here?”
- At position of token 2: “what would I have predicted here, given draft_token_1 was the previous token?”
- … and so on for all 16 positions.
All 16 predictions happen in parallel on the GPU. The cost is roughly the same as generating 1 token autoregressively — because the bottleneck (loading weights) happens once either way.
This is why speculative decoding works at all. It’s not a magic shortcut; it’s exploiting the fact that GPUs are massively parallel and modern LLMs are memory-bandwidth-limited.
Let me make this concrete:
What “verification” actually does, mechanically
The target model produces its own probability distribution at each of the 16 positions. Then for each draft token, it asks: “Would I have sampled this token here?”
The standard speculative sampling algorithm goes position-by-position through the draft:
- At position 1, the target outputs distribution
P_target. The draft proposed tokenxwith probabilityP_draft(x). - Accept
xwith probabilitymin(1, P_target(x) / P_draft(x)). - If accepted, move to position 2 and repeat.
- If rejected, throw out everything from this position onward, sample a corrected token from an adjusted distribution, and stop.
The key property — and this is the math behind why it’s lossless — is that this acceptance rule produces tokens with exactly the same distribution as if the target had generated them autoregressively. It’s been proven. You’re not approximating; you’re sampling from the true target distribution, just much faster.
Let’s trace one DFlash cycle:
- Drafter forward pass (cheap, small model, parallel) — produces 16 draft tokens
- Target forward pass (one expensive pass, but only one) — produces 16 distributions
- Acceptance check (negligible — tiny arithmetic on the CPU)
- Outcome: maybe 8 of 16 tokens were accepted as-is, plus 1 corrected token from the rejection point. So you got 9 real tokens for the cost of ~1 target forward pass + 1 cheap drafter pass.
Compare to plain autoregressive: 9 tokens would have cost 9 target forward passes. That’s where the ~6× speedup comes from. You’re trading one cheap draft pass for ~8 expensive autoregressive passes you didn’t have to do.
The intuition in one sentence
Diffusion can generate in parallel because a transformer doesn’t care which positions are masked when it does its matrix math — and verification is fast because loading the giant model’s weights costs the same whether you score 1 token or 16.
Speculative decoding is essentially a clever way of saying: “Since I’m paying for the expensive part anyway, let me get more done per payment.”
Refer Here https://z-lab.ai/projects/dflash/ Rayllm build VLLM
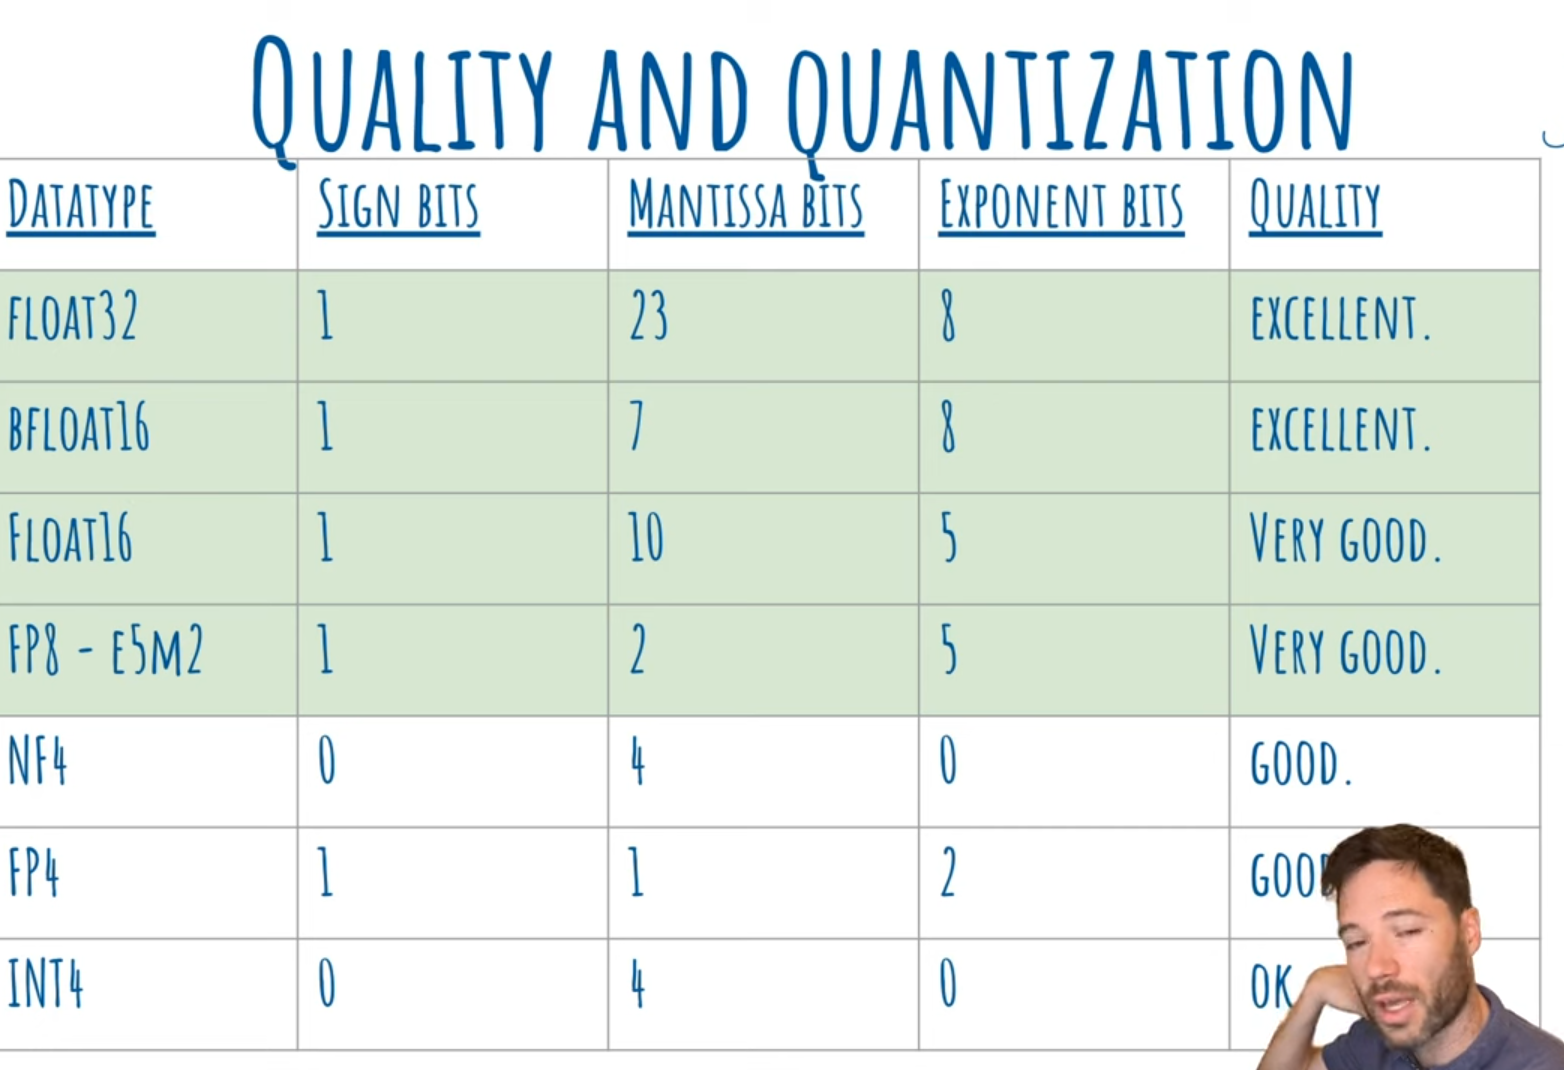
- Floating point allows us to represent very large and very small numbers with a compact number of bits.
- The number is split into:
- Sign bit → whether it’s + or -
- Exponent bits → how big or small (the “scale”)
- Mantissa bits (or significand) → the actual significant digits
Float = Sign × Mantissa × 2^(Exponent)
Why integer?
- Integer quantization (like INT4) is simpler → no exponent → fixed range → more compact → but less flexible for values that vary a lot in scale.
| Datatype | Sign Bits | Mantissa Bits | Exponent Bits | Dynamic Range | Precision | Typical Use | Quality |
|---|---|---|---|---|---|---|---|
| Float32 (FP32) | 1 | 23 | 8 | Very wide | Very high | Training | Excellent |
| BFloat16 (BF16) | 1 | 7 | 8 | Same as FP32 | Medium | Training (TPUs, GPUs) | Excellent |
| Float16 (FP16) | 1 | 10 | 5 | Smaller than FP32 | Good | Mixed precision training & inference | Very good |
| FP8 (E5M2) | 1 | 2 | 5 | Same range as FP16 | Low | Inference (Hopper, Blackwell) | Very good |
| NF4 (Normal Float 4) | 0 | 4 | 0 | None (fixed scale) | Good | Quantized inference | Good |
| FP4 | 1 | 1 | 2 | Small | Very low | Research-stage inference | Good (suspected) |
| INT4 | 0 | 4 | 0 | None | Very low | Final quantized inference | OK |

- GPU that support different floating points operation per sec
safetensors
The .safetensors file format stores the trained neural network weights—the billions of learned parameters that define the model’s behavior.
┌─────────────────────────────────────────┐
│ 8 bytes: Header size (uint64)          │
├─────────────────────────────────────────┤
│ JSON Header (metadata)                  │
│ {                                       │
│   "embedding": {                        │
│     "shape": [50000, 4096],            │
│     "dtype": "F32",                    │
│     "data_offsets": [0, 819200000]     │
│   },                                    │
│   "layer.0.weight": {                  │
│     "shape": [4096, 4096],             │
│     "dtype": "BF16",                   │
│     "data_offsets": [819200000, ...]   │
│   }                                     │
│ }                                       │
├─────────────────────────────────────────┤
│ Raw Tensor Data (flat binary arrays)   │
│ [0.234, -1.45, 0.891, ...]            │
└─────────────────────────────────────────┘
safetensors files are created when we save a trained model from pytroch it similar to pickel it alternative to pickel we store and load on pytroch or using vllm when we run
import torch
from safetensors.torch import save_file

# After training, extract model weights
model_weights = {
    "embedding.weight": model.embedding.weight,
    "layer.0.attention.weight": model.layers[0].attention.weight,
    "layer.0.ffn.weight": model.layers[0].ffn.weight,
    # ... all model parameters
}

# Save as safetensors
save_file(model_weights, "model.safetensors")
GGML
Ok basically a model is simply contain the math function and numbers which is weight trained so we need a engine which run and apply the math function or math operation on each layer for that we have different option like pytroch , tensorflow similar to that GGMl is written in c which is effective to run on cpu compared to that.
GGUF is a file format for storing models for inference with GGML and executors based on GGML. GGUF is a binary format that is designed for fast loading and saving of models, and for ease of reading. Models are traditionally developed using PyTorch or another framework, and then converted to GGUF for use in GGML.
So GGUF is:
A flat binary file with metadata + tensors at fixed offsets
{
  "encoder.layers.0.self_attn.q_proj.weight": numpy_array,
  "encoder.layers.0.self_attn.k_proj.weight": numpy_array,
  ...
}
So we have different base engine to run for transformer based we have lama.cpp and for whisper based we have whisper.cpp we can write our own using GGML
https://inference-technique-atlas.danialh.chatgpt.site/#tech-mixedquant
Tools
- https://github.com/algorithmicsuperintelligence/optillm?tab=readme-ov-file
- https://layerscale.ai/ (best fastest so far)
Resources
- LLM Inference Handbook
- Mastering LLM Techniques: Inference Optimization
- https://www.bentoml.com/blog/the-shift-to-distributed-llm-inference
- Mastering LLM Inference Optimization From Theory to Cost Effective Deployment: Mark Moyo
- The AI Engineer’s Guide to Inference Engines and Frameworks
- Inside vLLM: Anatomy of a High-Throughput LLM Inference System
- Fast LLM Inference From Scratch
- https://multimodalai.substack.com/p/the-ai-engineers-guide-to-inference
- https://lilianweng.github.io/posts/2023-01-10-inference-optimization/
- The AI Engineer’s Guide to Inference Engines and Frameworks
- https://multimodalai.substack.com/p/understanding-llm-inference
- https://bentoml.com/llm/inference-optimization
- https://read.theaimerge.com/p/the-ai-engineers-guide-to-inference