
Flutter Philosophy: Everything is a Widget
In React, everything is a component.
In Flutter, everything is a widget:
- A button is a widget.
- A layout (like Row, Column) is a widget.
- Even padding, margins, and colors are widgets!
Flutter builds the UI declaratively, just like React. You describe what the UI should look like, and Flutter handles rendering.
Core Building Blocks of Flutter
1. Widget (Base Class)
- The base class for all UI elements.
- Like
React.Component, but abstract. - Every visual or structural element is a widget.
abstract class Widget {
  const Widget();
}
2. StatelessWidget
- Used when the widget does not maintain any state.
- Like a pure functional component in React.
class MyWidget extends StatelessWidget {
  @override
  Widget build(BuildContext context) {
    return Text('Hello'); // Simple output
  }
}
3. StatefulWidget
- Used when the widget has mutable state.
- Like
useStatein React.
class MyStatefulWidget extends StatefulWidget {
  @override
  State<MyStatefulWidget> createState() => _MyStatefulWidgetState();
}

class _MyStatefulWidgetState extends State<MyStatefulWidget> {
  int counter = 0;

  void _increment() {
    setState(() {
      counter++;
    });
  }

  @override
  Widget build(BuildContext context) {
    return Text('Count: $counter');
  }
}
setState in Flutter is like calling setCounter(...) in React — it triggers a rebuild of the widget tree.
How Flutter Renders UI (under the hood)
- Widget Tree – Describes UI structure (like React’s virtual DOM).
- Element Tree – Created by Flutter to track widget instances and their state (runtime version of the widget tree).
- Render Tree – Lower-level tree used to draw pixels to the screen.
Every time setState is called:
- Flutter rebuilds only the part of the widget tree that needs updating.
- It compares widget configurations and reuses elements to optimize performance.
🔁 Flutter Lifecycle (React Equivalent)
| Flutter | React Equivalent | Purpose |
|---|---|---|
initState() | useEffect(() => {}, []) | Called once when stateful widget is created |
build() | Component render function | Called every time UI updates |
dispose() | Cleanup in useEffect | Cleanup before widget is removed |
setState() | setX() from useState() | Updates state and rebuilds UI |
| Tree | Purpose | Main Class | Who builds it? |
|---|---|---|---|
| Widget Tree | Describes the structure & config of UI | Widget | YOU (in Dart code) |
| Element Tree | Links Widgets to RenderObjects, manages lifecycle | Element | Flutter framework |
| Render Tree | Performs layout, paint, and hit testing | RenderObject | Built by framework from Widgets like RenderObjectWidget |
Widget Tree
-
A declarative description of the UI.
-
Built from immutable
Widgetobjects. -
Defines what the UI should look like.
-
Rebuilt frequently (e.g., every
setState). -
Cheap to create — just data/configs, no real “state” or layout info.
-
Stateless: doesn’t remember position or size.
Widget build(BuildContext context) {
  return Column(
    children: [
      Text("Hello"),
      ElevatedButton(onPressed: () {}, child: Text("Click")),
    ],
  );
}
This creates a tree like:
Column
├── Text
└── ElevatedButton
    └── Text
- Every rebuild creates new widget instances.
Element Tree
-
The runtime tree that maps Widget instances to their place in the UI.
-
Each
Widgetgets anElement, which holds:- The widget itself
- References to child elements
- Any associated
State(if stateful)
-
Maintains identity, position, and state.
-
Elements decide whether a widget can be reused or replaced on rebuild.
-
State is stored in elements — not widgets.
A StatefulWidget creates a StatefulElement, which holds:
- The widget instance
- The
Stateobject (your custom logic)
Render Tree
-
Tree of
RenderObjects that:- Measure layout (sizes/positions)
- Paint on screen (via canvas)
- Handle hit testing (for gestures)
-
Heavyweight: expensive to create/destroy
-
Maintained as efficiently as possible
-
Attached to the screen via
RenderView
RenderObject classes:
-
RenderBox(for box layout model) -
RenderFlex,RenderParagraph, etc. -
RenderObjectWidget→ createsRenderObject -
Element manages lifecycle, but RenderObject does the real work of layout & paint.
Flow Between Trees:
Here’s how Flutter builds the UI step by step:
You write Widgets →
    Framework creates Elements →
        Elements manage RenderObjects →
            RenderObjects perform layout, paint, hitTest
Rebuild flow:
setState() →
    Widget tree rebuilds →
        Element tree compares new vs old →
Reuses existing elements and RenderObjects if possibleArchitecture
Flutter’s architecture is built on three main layers: Embedder, Engine, and Framework. These layers work together to provide a fast, flexible, and performant development environment for building cross-platform applications. Let’s break each of these layers down:
1. Embedder Layer
The Embedder is the foundational layer of Flutter. It acts as the bridge between the Flutter engine and the platform (Android, iOS, Windows, Linux, etc.) your application is running on. It allows Flutter to interact with native platform features and hardware.
What it Does:
-
Platform-specific Initialization: The embedder sets up the application environment, including window creation, threading, and event loops. For example, on Android, it sets up the Android app lifecycle and ensures Flutter is integrated into the system.
-
Interfacing with OS APIs: The embedder interacts directly with the operating system to access native platform features like:
-
Window size and viewport management
-
Hardware acceleration and GPU rendering support
-
Accessibility services, input events, and gestures
-
Thread management and message handling (for event loops)
-
Platform Specific Embedders:
-
Android: The embedder initializes a Flutter
Activityand hooks into Android’s lifecycle (likeonCreate,onResume). -
iOS: The embedder interfaces with the
UIViewControllerandUIApplicationDelegate. -
Desktop (Windows/Linux/macOS): The embedder is responsible for setting up windows and initializing OpenGL/WebGL or Metal for rendering.
-
Custom Embedders: Flutter also supports custom embedders for platforms like Raspberry Pi or Embedded Systems, providing flexibility to target non-mainstream devices.
Key Concept:
The embedder layer is crucial because it integrates the Flutter engine into the host platform, making it possible for Flutter to run on any platform.
2. Engine Layer
The Engine is the powerhouse of Flutter. Written in C++, it is the low-level component that handles everything from rendering graphics to handling events. It is platform-agnostic, meaning it doesn’t care what platform it’s running on, as long as it has access to the embedder.
What the Engine Does:
-
Graphics and Rendering: The engine is responsible for drawing everything on the screen. It uses the Skia graphics library (which is also used by Chrome and Android) to render graphics. This gives Flutter its high-performance, hardware-accelerated rendering capabilities.
-
The Skia engine is a 2D graphics engine that renders all the pixels, whether it’s text, images, shapes, or animations.
-
It can also handle WebGL and Metal to ensure that Flutter apps look good across different platforms.
-
-
Text Rendering: The engine handles complex text rendering, including text shaping (e.g., proper rendering of fonts, letters, and languages), using the Skia and Harfbuzz libraries. This is especially important for languages with complex scripts (like Arabic, Hindi, etc.).
-
Event Handling: The engine provides a layer to handle input events (touch, gestures, keyboard input) through its event loop. These events are passed from the embedder to the engine, which then processes them for the Flutter framework.
-
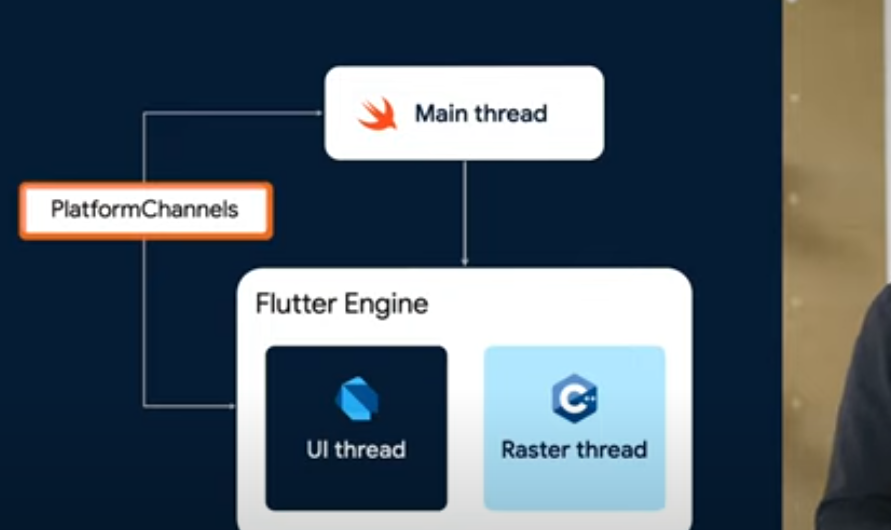
Platform Integration: The engine is responsible for providing support for platform channels, enabling Flutter to communicate with the underlying platform for native code execution.
-
Plugins and Runtimes: The engine includes mechanisms for plugins (like camera, geolocation, sensors, etc.) and runtime support for running Dart code (Flutter’s programming language).
Key Concepts:
-
Skia: A 2D graphics library that Flutter uses to render everything on the screen (from simple text to complex UI elements).
-
Platform Channels: These allow Flutter to communicate with native code. For example, Flutter can request device information (like the battery level) from the platform using platform channels.
3. Framework Layer
The Framework is where developers spend most of their time building applications. It sits on top of the Engine and is written in Dart, the programming language that powers Flutter.
What the Framework Does:
-
UI Composition: The framework allows developers to create the user interface (UI) using a reactive, declarative approach. In Flutter, everything is a widget. Whether it’s a simple button, a complex grid layout, or a custom animation, everything is built using widgets.
-
Widgets are immutable and stateful. They can be composed to create complex layouts and interactions.
-
Flutter emphasizes composition over inheritance, meaning you create complex widgets by combining simpler ones.
-
-
State Management: Flutter is a reactive framework, meaning it automatically updates the UI when the state changes. This makes it easier to build UIs that respond to changes in data.
-
Stateful Widgets: Widgets that have mutable state (e.g.,
TextField,Checkbox). -
Stateless Widgets: Widgets that do not have mutable state (e.g.,
Text,Icon).
-
-
Material Design and Cupertino: The Flutter framework comes with pre-built widgets that mimic the Material Design (Android-style) and Cupertino (iOS-style) components. This makes it easy to create native-looking apps for both platforms from a single codebase.
-
Rendering Pipeline: The framework defines how widgets should be displayed and how they interact with each other through the Render Object Tree. This ensures that UI elements are placed correctly on the screen, with proper constraints, layout, and painting.
-
Animation and Gesture: Flutter provides tools for managing animations, gestures, and painting directly in the framework, making it easy to add rich interactions and visual effects.
-
Foundation: At the heart of the framework is the Foundation library, which provides low-level services like asynchronous programming (
Future,Stream), system services (like networking), and helpers for working with Dart’s core libraries.
Key Concepts:
-
Widgets: The basic building blocks of a Flutter app. Every part of the UI is made of widgets, which are immutable.
-
Stateful vs Stateless Widgets: State affects how widgets behave, and Flutter uses a reactive model to ensure that the UI updates efficiently when the state changes.
-
Material and Cupertino Widgets: Widgets that mimic Android’s Material Design and iOS’s Cupertino Design, enabling cross-platform consistency.
Web-Specific Implementation
On the web, Flutter re-implements the engine on top of standard browser APIs instead of relying on platform-specific APIs like on mobile or desktop. This allows Flutter to work on browsers while keeping the same codebase.
Rendering Options:
-
HTML Mode: Uses HTML and CSS to render the app in the browser. It is lightweight and works well for simpler apps that need fast rendering.
-
CanvasKit (WebGL Mode): Uses Skia via WebAssembly to offer more advanced rendering capabilities, making it closer to what you get on native platforms in terms of performance and fidelity.
The HTML mode provides smaller app sizes, while CanvasKit offers better graphical fidelity but at the cost of larger file sizes and more complex rendering.
Platform Communication: Channels and Views
-
Platform Channels allow Flutter to communicate with the native code. These are typically used for accessing native functionality (e.g., device sensors, camera, Bluetooth). They serialize messages from Dart to the host platform and vice versa.
-
Platform Views: Allows Flutter to embed native platform views (like Android’s
WebViewor iOS’sUIWebView). While it’s a powerful feature, it’s resource-heavy and can lead to performance problems if used excessively, since native views do not leverage Flutter’s rendering pipeline.
Widget Creation and State Manipulation
Flutter’s approach to UI design is heavily influenced by the reactive programming model (similar to React).
-
Everything is a Widget: Whether it’s a simple button or a complex animation, everything is a widget.
-
Stateless vs Stateful Widgets: The distinction between widgets that are dependent on mutable state (Stateful) versus those that are constant (Stateless).
-
InheritedWidget: A special type of widget that is used for propagating state down the widget tree, allowing child widgets to access shared data without needing to pass it through constructors.
Layout and Rendering: The Three Trees
Flutter uses three primary trees to manage UI rendering efficiently:
-
Widget Tree: This tree represents the immutable description of the UI at a particular state. It is where widgets are defined.
-
Element Tree: The middle layer that binds the widgets to their mutable states and manages interactions.
-
Render Object Tree: The lowest layer, responsible for actual rendering on the screen.
Each tree has its role in optimizing performance and ensuring that UI updates are handled efficiently, with minimal re-rendering.
You’re asking to see the “code” after Flutter builds the Counter widget. It’s important to clarify that Flutter doesn’t convert your Dart widget code into another form of Dart code that you can inspect directly at runtime. Instead, it creates a tree of internal objects: the Element tree and the RenderObject tree.
Think of it less as a code transformation and more as an object instantiation and management process.
Here’s a conceptual representation of the objects Flutter creates and how they relate, based on your Counter widget:
graph TD
    subgraph Widget Tree (Immutable Descriptions)
        A[MyApp Widget] --> B[MaterialApp Widget]
        B --> C[Scaffold Widget]
        C --> D[Counter StatefulWidget]
        D --> E[Column Widget]
        E --> F[Text Widget (Count: 0)]
        E --> G[ElevatedButton Widget]
        G --> H[Text Widget (Increment)]
    end

    subgraph Element Tree (Mutable Instances & State)
        I(StatelessElement for MyApp) --> J(StatelessElement for MaterialApp)
        J --> K(StatelessElement for Scaffold)
        K --> L(StatefulElement for Counter)
        L -- manages --> M(_CounterState instance)
        L --> N(RenderObjectElement for Column)
        N --> O(RenderObjectElement for Text 'Count: 0')
        N --> P(RenderObjectElement for ElevatedButton)
        P --> Q(RenderObjectElement for Text 'Increment')
    end

    subgraph RenderObject Tree (Layout & Painting)
        R[RenderView]
        R --> S[RenderBox for MaterialApp]
        S --> T[RenderBox for Scaffold]
        T --> U[RenderBox for Column]
        U --> V[RenderParagraph for Text 'Count: 0']
        U --> W[RenderFlex for ElevatedButton]
        W --> X[RenderParagraph for Text 'Increment']
    end

    WidgetTree -- creates --> ElementTree
    ElementTree -- creates/updates --> RenderObjectTree
    M -- calls setState() on --> L
Detailed Conceptual Breakdown
When Flutter “builds” your Counter widget within the context of MyApp, it essentially performs these steps to construct its internal representation:
1. The Widget Tree (Your Dart Code)
This is the code you write. It’s a static, immutable description of the UI.
-
MyApp-
MaterialApp-
Scaffold-
Counter(YourStatefulWidget)-
Column-
Text('Count: $count') -
ElevatedButtonText('Increment')
-
-
-
-
-
2. The Element Tree (The Runtime Representation)
This is where the magic happens. Flutter creates Element objects that correspond to your Widgets. Elements are mutable and live much longer than Widgets. They hold references to Widgets and, for StatefulElements, to State objects.
// Conceptual representation of the Element objects created by Flutter
// This is NOT runnable Dart code, but an illustration of the internal hierarchy.

// Root Element
StatelessElement myAppElement = StatelessElement(widget: MyApp());

// Descending into MaterialApp
StatelessElement materialAppElement = StatelessElement(widget: MaterialApp(...));
myAppElement.addChild(materialAppElement);

// Descending into Scaffold
StatelessElement scaffoldElement = StatelessElement(widget: Scaffold(...));
materialAppElement.addChild(scaffoldElement);

// Encountering Counter (StatefulWidget)
// 1. Flutter calls Counter().createState()
_CounterState counterStateInstance = _CounterState(); // count = 0

// 2. Flutter creates the StatefulElement
StatefulElement counterElement = StatefulElement(
    widget: Counter(), // Holds a reference to the Counter widget instance
    state: counterStateInstance // Holds a reference to the _CounterState instance
);
scaffoldElement.addChild(counterElement);

// Linking State to Element and Widget:
counterStateInstance.widget = Counter(); // Flutter sets this internally
counterStateInstance.context = counterElement; // Flutter sets this internally

// Now, the counterElement's build() method is called, which in turn
// calls counterStateInstance.build(counterElement).
// This returns the Column, Text, and ElevatedButton widgets.

// Creating Elements for children of Counter
RenderObjectElement columnElement = RenderObjectElement(widget: Column(...));
counterElement.addChild(columnElement);

RenderObjectElement textElement = RenderObjectElement(widget: Text('Count: 0'));
columnElement.addChild(textElement);

RenderObjectElement elevatedButtonElement = RenderObjectElement(widget: ElevatedButton(...));
columnElement.addChild(elevatedButtonElement);

RenderObjectElement buttonTextElement = RenderObjectElement(widget: Text('Increment'));
elevatedButtonElement.addChild(buttonTextElement);

// When setState(() => count++) is called in _CounterState:
// 1. `count` in `counterStateInstance` becomes 1.
// 2. `counterElement` is marked as dirty.
// 3. In the next frame, `counterElement.update(new Counter())` is called.
//    (Even if `new Counter()` is a different instance, the `counterElement` and `counterStateInstance` persist).
// 4. `counterElement` calls `counterStateInstance.build(counterElement)` again.
// 5. This returns a *new* `Text('Count: 1')` widget.
// 6. Flutter compares the `old Text` widget's type with the `new Text` widget's type.
//    Since they are both `Text` widgets, it reuses `textElement`.
// 7. It then updates `textElement`'s internal properties, which triggers
//    an update to its associated `RenderObject` to draw "Count: 1".
3. The RenderObject Tree (The Painting & Layout)
The Elements that represent widgets capable of painting and layout (like Column, Text, ElevatedButton) create RenderObjects. This tree is what Flutter uses to actually draw pixels on the screen.
// Conceptual representation of RenderObjects created by Flutter
// This is also NOT runnable Dart code.

// Global root RenderObject
RenderView rootRenderView = RenderView(...);

// RenderObject for MaterialApp's visual output
RenderBox materialAppRenderBox = RenderBox(...); // Represents the visual content of MaterialApp
rootRenderView.addChild(materialAppRenderBox);

// RenderObject for Scaffold's visual output
RenderBox scaffoldRenderBox = RenderBox(...); // Represents the visual content of Scaffold
materialAppRenderBox.addChild(scaffoldRenderBox);

// RenderObject for Column
RenderFlex columnRenderBox = RenderFlex(direction: Axis.vertical); // Manages vertical layout
scaffoldRenderBox.addChild(columnRenderBox);

// RenderObject for Text 'Count: 0'
RenderParagraph textRenderObject = RenderParagraph(text: 'Count: 0', ...); // Draws text
columnRenderBox.addChild(textRenderObject);

// RenderObject for ElevatedButton (simplified, typically a RenderPhysicalModel or similar)
RenderBox elevatedButtonRenderBox = RenderBox(...); // Manages button visuals and interaction
columnRenderBox.addChild(elevatedButtonRenderBox);

// RenderObject for Text 'Increment' inside the button
RenderParagraph buttonTextRenderObject = RenderParagraph(text: 'Increment', ...);
elevatedButtonRenderBox.addChild(buttonTextRenderObject);

// When count changes and rebuilds:
// The `textRenderObject` (associated with the `textElement`)
// will be updated internally to display the new text "Count: 1"
// without recreating the entire RenderObject or its parent.
sdkmanager "platform-tools" "platforms;android-34" "build-tools;34.0.0"
flutter run -d 1372822472004JU
Got it! Here’s your setup guide **converted into a clean, book-style format** — **without** chapter numbers or icons — just clear headings and precise steps:
---
## Install Flutter on Linux (Without Android Studio)
This guide explains how to set up Flutter and the Android SDK **without installing Android Studio**, using only the command line tools.
---
### Download Flutter SDK
1. Open your terminal and run:
```bash
cd ~
wget https://storage.googleapis.com/flutter_infra_release/releases/stable/linux/flutter_linux_3.22.1-stable.tar.xz
tar xf flutter_linux_3.22.1-stable.tar.xz
This downloads and extracts Flutter to your home directory.
Add Flutter to Your PATH
-
Add Flutter’s
bindirectory to your system PATH so you can run Flutter commands globally:echo 'export PATH="$PATH:$HOME/flutter/bin"' >> ~/.bashrc source ~/.bashrcThis updates your shell configuration and reloads it.
Verify Flutter Installation
-
Confirm that Flutter is installed correctly:
flutter doctorThis will check your system and show what’s missing.
Install Android SDK Command Line Tools
To build Android apps, you need the Android SDK and its tools. Here’s how to install it without Android Studio.
Download the Command Line Tools
-
Create the required directories and download the tools:
mkdir -p ~/Android/cmdline-tools cd ~/Android wget https://dl.google.com/android/repository/commandlinetools-linux-11076708_latest.zip unzip commandlinetools-linux-11076708_latest.zip -d cmdline-tools -
Organize the folder structure as expected by the SDK:
mkdir -p ~/Android/cmdline-tools/latest
mv ~/Android/cmdline-tools/cmdline-tools/* ~/Android/cmdline-tools/latest/
Add Android SDK to PATH
-
Add the Android SDK tools to your PATH:
echo 'export ANDROID_HOME=$HOME/Android' >> ~/.bashrc
echo 'export PATH=$PATH:$ANDROID_HOME/cmdline-tools/latest/bin' >> ~/.bashrc
echo 'export PATH=$PATH:$ANDROID_HOME/platform-tools' >> ~/.bashrc
source ~/.bashrc
This lets you run
sdkmanagerand other tools anywhere.
Install SDK Packages
-
Use
sdkmanagerto install required packages:sdkmanager --sdk_root=$ANDROID_HOME --licenses sdkmanager --sdk_root=$ANDROID_HOME "platform-tools" "platforms;android-34" "build-tools;34.0.0"If the above does not work, run the commands manually:
cd ~/Android/cmdline-tools/latest/bin
./sdkmanager --update
./sdkmanager "platform-tools"
./sdkmanager "platforms;android-34"
./sdkmanager "build-tools;34.0.0"
This installs:
- ADB (
platform-tools) - The Android 34 SDK platform
- Build tools for compiling
- Emulator (optional)
- ADB (
Accept All SDK Licenses
-
Accept all required licenses:
yes | sdkmanager --sdk_root=$ANDROID_HOME --licensesThis step is required to use the SDK.
flutter config —android-sdk ~/Android/cmdline-tools/latest/bin